How to Customize the Back to Top Button in Divi


How time flies! Over a year ago I published my first tutorial. It was on how to transform the back to top button into a button that triggers a contact form. In this tutorial, I will show you how to stylize the back to top button. At the beginning, we will change its shape to round, and color, and then we will add some hover effects. I will also show you how to change its position and add a fancy ripple effect.
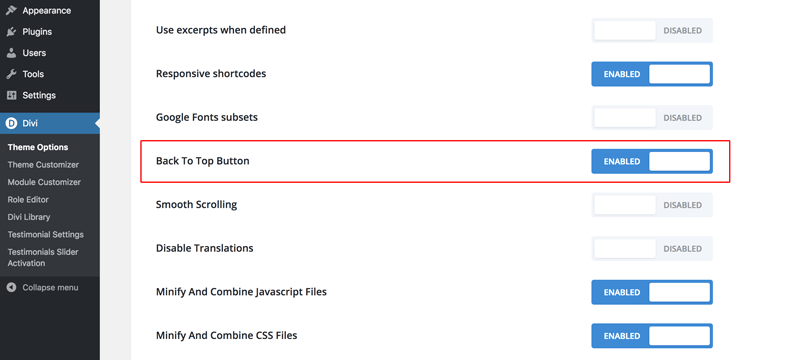
To get started, we will need to enable the Back To Top Button option. To do that, go to the Divi/Theme Options tab located in your WordPress dashboard and make sure the option is enabled. In the next step, we will be adding custom CSS that will completely change the appearance of our back to top button.
Note: All examples below contain custom CSS which should be added to Divi/Theme Options/Custom CSS
Circle Button with Hover Animation
In this example, I will show you how to make our button circular, change its color, and add a nice hover effect that will move our button up smoothly and add a subtle box shadow on mouseover. We will also change the in and out animation. By default, the back to top button slides in from the right. We will change this animation so it will slide in from the bottom. To add this improvement to your site, simply add the following code to Divi/Theme Options/Custom CSS or to your Divi child theme if you have one (recommended option). You can edit all values to match your company brand.

|
1 2 3 4 5 6 7 8 9 10 11 12 13 14 15 16 17 18 19 20 21 22 23 24 25 26 27 28 29 30 31 32 |
/* Default button appearance */ .et_pb_scroll_top.et-pb-icon { right: 30px; /* space from right */ bottom: 30px; /* space from bottom */ padding: 8px; /*padding size*/ border-radius: 30px; /* make the circle */ background: rgb(0, 101, 253) /* button color */; font-size: 32px; /* icon size */ transition: all .1s ease-in-out; /* add transition */ } /* Button Appearance on Mouseover */ .et_pb_scroll_top.et-pb-icon:hover { bottom: 32px /* space from bottom */; background: rgb(7, 69, 160) /*button hover color*/; transition: all .1s ease-in-out; /*add transition*/ box-shadow: 0 10px 15px #162c4e4a; /*box shadow on hover*/ } /* Animation tweaks */ .et_pb_scroll_top.et-visible { -webkit-animation: fadeInBottom 1s 1 cubic-bezier(.50,0,.160,1); -moz-animation: fadeInBottom 2s 1 cubic-bezier(.50,0,.160,1); -o-animation: fadeInBottom 1s 1 cubic-bezier(.50,0,.160,1); animation: fadeInBottom 1s 1 cubic-bezier(.50,0,.160,1); } .et_pb_scroll_top.et-hidden { opacity: 0; -webkit-animation: fadeOutBottom 1s 1 cubic-bezier(.77,0,.175,1); -moz-animation: fadeOutBottom 1s 1 cubic-bezier(.77,0,.175,1); -o-animation: fadeOutBottom 1s 1 cubic-bezier(.77,0,.175,1); animation: fadeOutBottom 1s 1 cubic-bezier(.77,0,.175,1); } |
Using Centered GIF Image
Using an image or a GIF gives us the unlimited possibilities because we can design our back to top button just like we want and use it instead of the default style. To make it even cooler, we can animate our image and save it as a GIF. In this example, I will show you how to replace the back to top button with a GIF or image and place it on the middle bottom of the screen. We will also change the animation. For this example, we will use a premade GIF image that I have prepared earlier. It can be downloaded here. The package contains 10 awesome premade GIFs that can be used on your website, and the working copy of the After Effects file which can be edited.
1) Upload the desired image to your Media Library and copy its URL.
2) Add CSS to Divi/Theme Options/Custom CSS or your child theme stylesheet and replace image url with the url you have copied in the previous step.
|
1 2 3 4 5 6 7 8 9 10 11 12 13 14 15 16 17 18 19 20 21 22 23 |
.et_pb_scroll_top:before { content: url(https://your-image-url-here.gif);/*Your image URL*/ } .et_pb_scroll_top.et-pb-icon { background: none; right:48%; bottom: -7px; } /* Animation from Bottom */ .et_pb_scroll_top.et-visible { -webkit-animation: fadeInBottom 1s 1 cubic-bezier(.50,0,.160,1); -moz-animation: fadeInBottom 2s 1 cubic-bezier(.50,0,.160,1); -o-animation: fadeInBottom 1s 1 cubic-bezier(.50,0,.160,1); animation: fadeInBottom 1s 1 cubic-bezier(.50,0,.160,1); } .et_pb_scroll_top.et-hidden { opacity: 0; -webkit-animation: fadeOutBottom 1s 1 cubic-bezier(.77,0,.175,1); -moz-animation: fadeOutBottom 1s 1 cubic-bezier(.77,0,.175,1); -o-animation: fadeOutBottom 1s 1 cubic-bezier(.77,0,.175,1); animation: fadeOutBottom 1s 1 cubic-bezier(.77,0,.175,1); } |
Back to Top Button with Arrow Icon
In this example, I will show you how to replace the default back to top icon with an arrow. Divi has a great collection of icon fonts already built in, so we just need to replace the code for the icon. Full list of icon font unicodes can be found here: The Elegant Icon Font – 360 Of The Best Free Icons For The Modern Web

|
1 2 3 4 5 6 7 8 9 10 11 12 13 14 15 16 17 |
.et_pb_scroll_top:before { content: "\21";/*select icon*/ } .et_pb_scroll_top.et-pb-icon { right: 20px; /*right space*/ bottom: 20px; /*bottom space*/ border-radius: 0px;/*border radius*/ background: #838ab1;/*button background color*/ padding: 20px;/*space around the icon*/ font-size: 24px;/*icon size*/ transition: all .1s ease-in-out; /*add transition*/ } .et_pb_scroll_top.et-pb-icon:hover { background: #6078ff;/*background color on hover*/ transition: all .1s ease-in-out; /*add transition*/ } |
Horizontal Button with Back To Top Text and Icon
In this sample, we will use a rounded button with Back To Top text and add an arrow icon. To accomplish this, we will use :before class to add an icon and :after class to add a button text.

|
1 2 3 4 5 6 7 8 9 10 11 12 13 14 15 16 17 18 19 20 21 22 23 24 25 26 27 28 29 30 31 32 33 34 35 36 37 38 39 40 |
.et_pb_scroll_top:after { content: "Back To Top";/*button text*/ font-family: "Open Sans",Arial,sans-serif;/*text font*/ font-size:12px;/*text size*/ } .et_pb_scroll_top:before { content: "\21";/*select icon*/ font-family: ETmodules !important; font-size:12px;/*icon size*/ margin-right: 5px; } .et_pb_scroll_top.et-pb-icon { padding: 0px 20px 17px; right: 20px; bottom: 30px; border-radius: 100px; background: #1dbbe1;/*button color*/ box-shadow: 0 10px 20px #37798940; transition: all .1s ease-in-out; } .et_pb_scroll_top.et-pb-icon:hover { background: #00ceff;/*button color on hover*/ transition: all .1s ease-in-out; /*add transition*/ } /*Add Animation from Bottom */ .et_pb_scroll_top.et-visible { -webkit-animation: fadeInBottom 1s 1 cubic-bezier(.50,0,.160,1); -moz-animation: fadeInBottom 2s 1 cubic-bezier(.50,0,.160,1); -o-animation: fadeInBottom 1s 1 cubic-bezier(.50,0,.160,1); animation: fadeInBottom 1s 1 cubic-bezier(.50,0,.160,1); } .et_pb_scroll_top.et-hidden { opacity: 0; -webkit-animation: fadeOutBottom 1s 1 cubic-bezier(.77,0,.175,1); -moz-animation: fadeOutBottom 1s 1 cubic-bezier(.77,0,.175,1); -o-animation: fadeOutBottom 1s 1 cubic-bezier(.77,0,.175,1); animation: fadeOutBottom 1s 1 cubic-bezier(.77,0,.175,1); } |
Vertical Button with Back To Top Text and Icon
This last example features a vertically aligned Back To Top button with text and an arrow icon at the top. To achieve this style, we will need to add custom CSS and javascript to our Divi website. As usually, the custom CSS should be added to Divi/Theme Options/Custom CSS or child theme stylesheet while the script can be added in the Divi/Theme Options/Integration tab or to the footer.php or header.php file located in your child theme if you use one.

|
1 2 3 4 5 6 7 8 9 10 11 12 13 14 15 16 17 18 19 20 21 22 23 24 25 26 27 28 29 30 31 32 33 34 35 36 37 38 39 40 41 42 43 44 45 46 47 48 49 50 51 52 53 54 55 56 57 58 59 60 61 62 63 64 65 66 67 68 69 70 71 72 |
.et_pb_scroll_top { z-index: 9999999; position: fixed; right: 20px; bottom: 20px; background: #fd3607; height: 100px; box-shadow: 0 2px 4px rgba(108,46,185,0.2); -webkit-transition: all 0.2s ease,-webkit-transform 0.6s ease; transition: all 0.2s ease,-webkit-transform 0.6s ease; transition: all 0.2s ease,transform 0.6s ease; transition: all 0.2s ease,transform 0.6s ease,-webkit-transform 0.6s ease; cursor: pointer; } .et_pb_scroll_top:before { display: none; } .et_pb_scroll_top:after { content: "\24"; font-family: ETmodules !important; color: #fff; font-size: 16px; font-weight: 700; margin-left: 10px; } .et_pb_scroll_top, .et_pb_scroll_top.et-visible,.et_pb_scroll_top.et-hidden { -webkit-animation: none !important; animation: none !important; } .et_pb_scroll_top,.et_pb_scroll_top.et-hidden { -webkit-transform: scale(0) rotate(0deg); transform: scale(0) rotate(0deg); } .et_pb_scroll_top.et-visible { -webkit-transform: scale(1) rotate(360deg); transform: scale(1) rotate(360deg); } .et_pb_scroll_top .et-pb-icon { position: absolute; top: 50%; left: 50%; -webkit-transform: translate(-50%, -50%); transform: translate(-50%, -50%); } .et_pb_scroll_top { right: 0; width: auto; padding: 0 20px; line-height: 40px; } .et_pb_scroll_top:before { content: 'Back To Top'; display: inline-block; color: #FFF; font-weight: 700; } .et_pb_scroll_top,.et_pb_scroll_top.et-hidden { right: 40px; bottom: 100px; -webkit-transform-origin: right top; transform-origin: right top; -webkit-transform: scale(1) translate(100%, 0) rotate(-90deg); transform: scale(1) translate(100%, 0) rotate(-90deg); } .et_pb_scroll_top.et-visible { -webkit-transform: rotate(-90deg); transform: rotate(-90deg); } .et_pb_scroll_top .et-pb-icon { display: none; } |
In the next step, we need to add custom JavaScript code. To do that, go to the Divi/Theme Options/Integration tab and add code to < head > of your blog section (as in the image below).

|
1 2 3 4 5 6 |
<script type="text/javascript"> jQuery(document).ready(function ($) { $('.et_pb_scroll_top').addClass('et-hidden').removeClass('et-pb-icon'); }); </script> |
Maciej Ekstedt
Creative Director
Maciej is the founder and CEO of B3 Multimedia Solutions. He is a self-made web designer and marketing expert, and he loves his job so much that he barely leaves the office. He transforms creative ideas into effective strategies for his company and for his clients. Maciej is fascinated by the phenomenon of megalopolis. He notices patterns and details which make up the whole thing, and he uses these skills in his work.


This is nice tutorial! I often change the styling as well, but these extra styles will go great on some of my projects.
Thanks Nelson! Hopefully this will be useful 🙂
Thanks so much for your this great tutorial, I hope everyone appreciates the amount of detail and work you have done for the Divi community. This is a terrific terrific resource.
I followed, and further customized slightly, the code for the #4 design above. All looks pretty good after publish. But, when I return to the browser and looked at the Homepage, the default Divi BtoT button appears. I went back to the custom CSS screen and the new button shows as expected.
In short, what code or setting is nec’y to be sure the newly created button replaces the default Divi/WP? Thanks for sharing the code and for any help you can give to solve my problem.
awesome, what if i want the back to top button to the left instead of to the right? what’s the ccss code??
Hello Alex,
You would need to tweak some CSS. The following code seems to be working (change right to left and add width property):
.et_pb_scroll_top.et-pb-icon {
left: 30px;
width: fit-content;
}
Awesome! Thank you!
great. It help me a lot. Thanking for the great article
Hey! Nice effects and easy to integrate. Thank you so much
@Maciej – Thank you, sir. This. Is. Awesome. I didn’t like the default option and wanted something a little more…me.
Excellent, got the results I was looking for. Thank you very much for this information.
I’m glad to hear it was helpful 🙂 Have a good day!
Hi,
really great buttons, thank you!!
May I just ask how to change the starting point of animation “2 Using Centered GIF Image” a bit later.
If the site is long the arrows fade in too early.
Thanks for your help.
Jasmin
The code worked great but is not working on mobile. Any idea how to fix it?