How To Create A Full Width Logo Section

Every business logo is unique and has its own colours. Some are oriented horizontally and some vertically. We need to make sure they all look good on our website and this can sometimes be difficult.
In this tutorial, I will show you how to add a group of logos to your website and still control the design. Divi by default offers a maximum of 4 column layout. We will add a few lines of code that will enable us to display up to ten columns so that we can fit as many logos as we want and it will still be compact and aesthetically pleasing! We will also add some filters so that all the logos will be in greyscale colour by default and when the user mouses over the logo, the logo changes colour and is scaled up. Are you ready? Let’s get started!
- You will need to have the Divi Theme by Elegant Themes installed.
- You can follow this tutorial or download Ready-To-Use Divi Builder section with CSS code embedded.


Prepare logo images
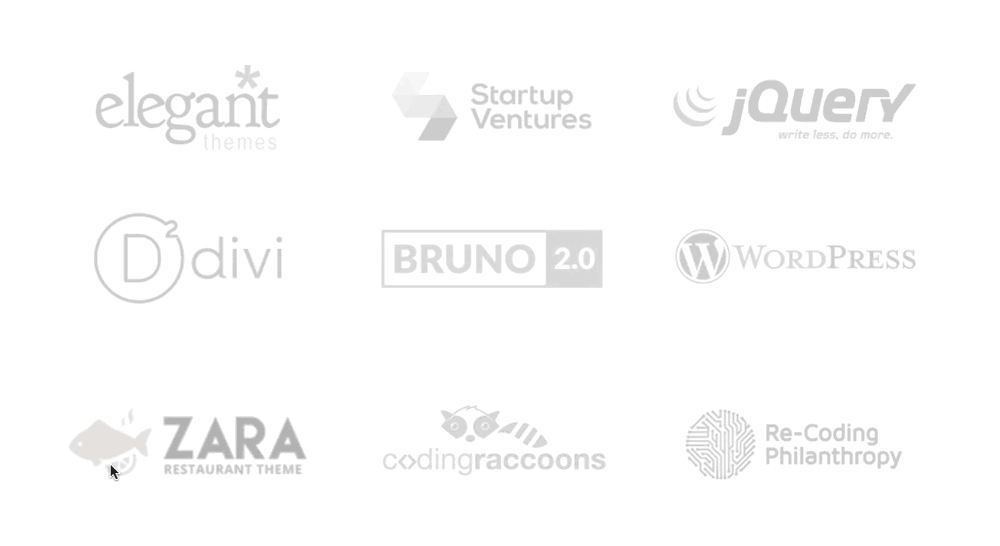
Before we start building our section we need to prepare the logos that we want to display. It is recommended to use the same size images for all the logos so that they are scaled properly and look proportional. I’m using Photoshop for editing all the images. You can choose your favorite graphic design software to achieve the same purpose. For this tutorial I have prepared 12 logos, each 400 px in width and 150 px in height. All images are saved as a png file and they are run through tinyPNG to compress and optimize their size *. You can also save the images as jpgs, it’s up to you.
* This step is optional. Compression only saved me a 300kb in size which is not much. I’m getting into the habit of doing this for all png images that are uploaded to our website. This helps to increase website speed and save some server space.
Add Section, Rows and Modules
For this tutorial we will add 2 rows and 6 Text Modules inside each row.
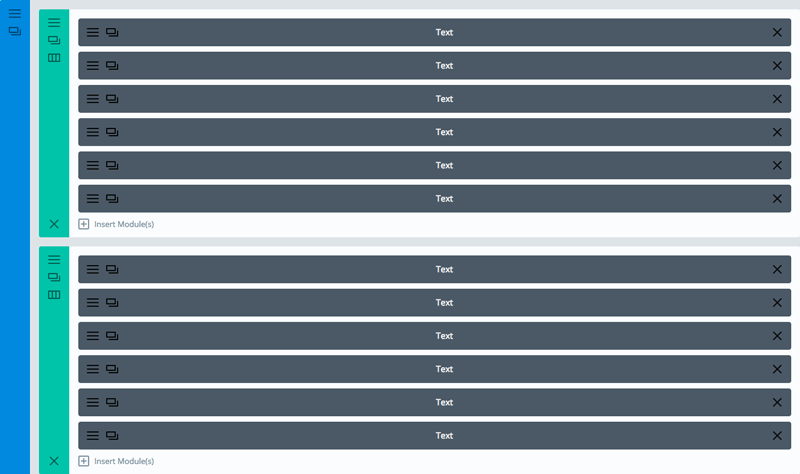
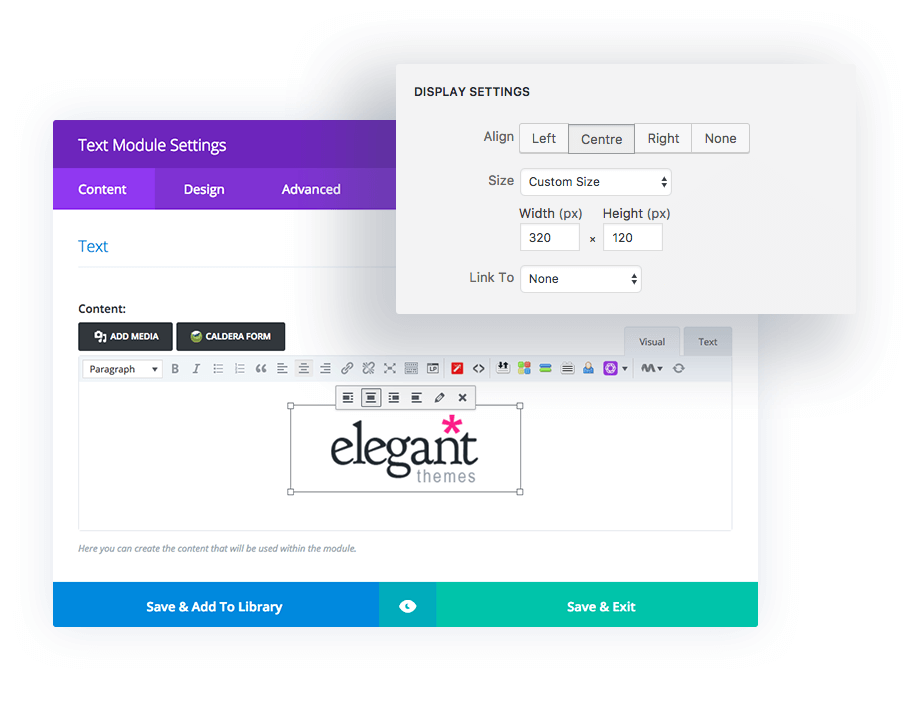
For each Text Module we add our image center aligned. By clicking on the Pen icon (Edit) we can access advanced image settings. Here, for example, we can change the image size or apply a custom class if required.
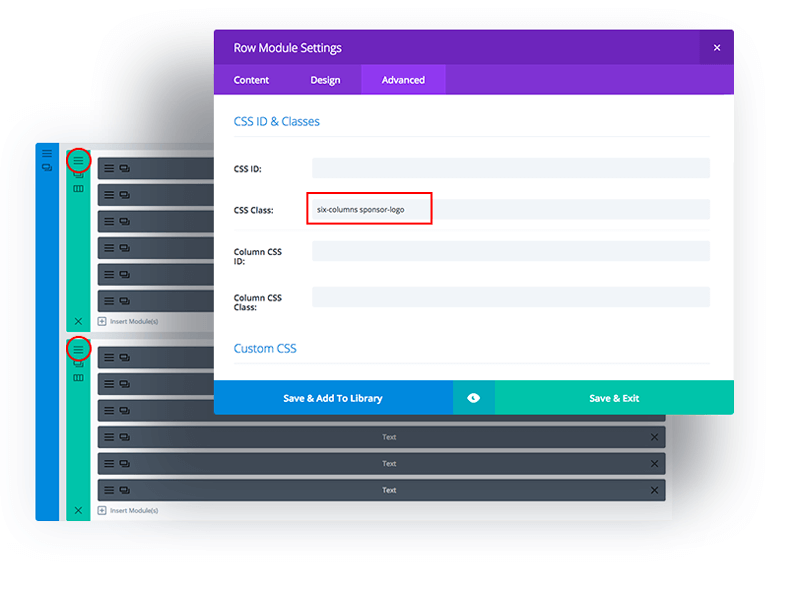
Apply CSS Class to Rows
In this step we need to apply 2 classes to both rows. Open Row Module Settings and add six-columns company-logo to CSS Class field located in the Advanced Tab.
If you would like to display a different number of logos per row, for example, 5 or 7, then you can use different class accordingly instead of six-columns, eg five-columns. You will also have to add more Text Modules in order to display more logos in one row, so if you want 7 logos in a row, you will need 7 Text Modules.
Supported Classes:
ten-columns
nine-columns
eight-columns
seven-columns
six-columns
five-columns
Adding CSS
In this last step we will add some CSS to the Divi/Theme Options/Custom CSS section or you can just copy and paste it in to your style.css file located in your child theme folder – Appearance/Editor. Make sure to save your work.
|
1 2 3 4 5 6 7 8 9 10 11 12 13 14 15 16 17 18 19 20 21 22 23 24 25 26 27 28 29 30 31 32 33 34 35 36 37 38 39 40 41 42 43 44 45 46 47 48 49 50 51 52 53 54 |
/* COLUMNS */ .ten-columns .et_pb_module {width: 10%; float: left;} .nine-columns .et_pb_module {width: 11.11%; float: left;} .eight-columns .et_pb_module {width: 12.5%; float: left;} .seven-columns .et_pb_module {width: 14.28%; float: left;} .six-columns .et_pb_module {width: 16.66%; float: left;} .five-columns .et_pb_module {width: 20%; float: left;} @media only screen and (max-width: 970px) { /* For tablets: */ .ten-columns .et_pb_module, .nine-columns .et_pb_module, .eight-columns .et_pb_module, .seven-columns .et_pb_module, .six-columns .et_pb_module, .five-columns .et_pb_module { width: 33%; } } @media only screen and (max-width: 760px) { /* For mobile phones: */ .ten-columns .et_pb_module, .nine-columns .et_pb_module, .eight-columns .et_pb_module, .seven-columns .et_pb_module, .six-columns .et_pb_module, .five-columns .et_pb_module { width: 50%; } } @media only screen and (max-width: 600px) { /* For mobile phones: */ .ten-columns .et_pb_module, .nine-columns .et_pb_module, .eight-columns .et_pb_module, .seven-columns .et_pb_module, .six-columns .et_pb_module, .five-columns .et_pb_module { width: 100%; } } /* END */ /* LOGOS */ .company-logo img { -webkit-filter: grayscale(100%); /* Safari 6.0 - 9.0 */ filter: grayscale(100%); transform:scale(0.95); opacity: 0.25; -webkit-transition: all .4s ease; -moz-transition: all .4s ease; -ms-transition: all .4s ease; -o-transition: all .4s ease; transition: all .4s ease; } .company-logo img:hover { opacity:1; transform:scale(1); -webkit-filter: grayscale(0%); /* Safari 6.0 - 9.0 */ filter: grayscale(0%); -webkit-transition: all .4s ease; -moz-transition: all .4s ease; -ms-transition: all .4s ease; -o-transition: all .4s ease; transition: all .4s ease; } /* END */ |
Maciej Ekstedt
Maciej is the founder and CEO of B3 Multimedia Solutions. He is a self-made web designer and marketing expert, and he loves his job so much that he barely leaves the office. He transforms creative ideas into effective strategies for his company and for his clients. Maciej is fascinated by the phenomenon of megalopolis. He notices patterns and details which make up the whole thing, and he uses these skills in his work.
Live Preview
The Divi Toolbox is the best plugin to power up the Divi theme.
Get 10% off with coupon code TOOLBOX10


Can we have this in a slider? So it shows 6 logo
s and then slides to the next 6 logos?Unfortunately not. I used standard Divi Modules for this tutorial. If you would like to have it in a slider mode then you will probably have to use some 3rd party plugin.
Awesome, I have use for this immediately! Another great tutorial.
Well done, Maciej. Thanks.
This is fantastic. Where is the download link located for the Ready-To-Use Divi Builder section with CSS code embedded?
Hi Jonah. Our bad 🙂 The link to the layout has been added.
This is really handy! Many thanks it’s going to save me a ton of trial and error.
Hi Maciej and all visitors.
I was really curious about what was said above. Can it be used in a slider?
And sure it can, but as Maciej said, 3rd party plugin have to be used.
However, it really was easier than that. I used 1 3rd party plugin and that is AC Shortcode everything else DIVI Builder will provide.
The result can be seen at http://divi.nu (at the bottom of course)
regards
Lasse
Hi Lars,
This is really amazing. Sliding logos looks great!
Thx Maciej,
you made the logos.
As slider I used the built-in “Shortcode Tabs” (simple version) 🙂
have a nice weekend m8 🙂
This doesn’t seem to work maybe with the most updated version of divi? Any ideas?
Hi Cody. Sorry to hear that but if it works here it means it works with the latest WP and Divi. You must be missing something :/ What is the url?
Great Job! Thanks so much
Do you have any tutorial on getting this contact us form popup? https://polygon.b3multimedia.ie/contact/#cf-modal-CF5957eaeb7ce6b5aaa939adf1de
This is Caldera Form triggered after menu button is clicked. We do not have tutrial about customizing form like that but we have a tutorial on How to add a floating bubble icon that opens contact form popup
All the logos are blocked by uBlock Origin (one of the most popular ad blockers out there), which makes this not a good solution, unfortunately.
Hi Nate, it’s because “sponsor”class has been used. You need to just replace that with something else and it won’t be blocked anymore. We have also fixed this tutorial, changed code and uploaded fixed .json file with logo section 🙂
hi, I love your tutorials. Is their anyway you can add some comments to maybe explain some of the CSS codes. That would help a lot.
Kind regards
PS. Love the tutorials and I do appreciate them.
Hi Yesi, I will try next time to add comments that will put some light on the styles added! Thank you for your comment!
Great feature, Ive included it on my Divi-site!
How do I manipulate it to show only 3 or 4 logos?
I do not have more to show at the moment 🙁
I would like it to be more spacing between if so.
Just like in the example in top of this article actually! 🙂
This is a very useful tutorial mate! Thank you! Cheers!
You welcome Jason! 🙂
There is a mistake in the tutorial. In step 3 you add “six-columns SPONSOR-logo” while the CSS to enter only includes “COMPANY-logo”. Therefor it does not work. Took me way to long to find out. Please correct.
Hi Jonas! Great catch! Thank you for mentioning that, it’s fixed now!
We have made some changes to the code because sponsor-logo class was blocked by ad blockers so we change to company-logo, but missed that one!
Perfect. It’s still wrong in the picture though.. 😉
Thank you – great tutorial, it worked brilliantly!
hey maciej!
i love this but I can’t get it to work/. It just doesn’t stack correctly when it hits the tablet breakpoint:
emailbroadcast.jasoncox.co/adventure-travel
I tried building it from scratch and I tried loading in the JSON – same result.
Any ideas?
Thanks!
jason
Hi Jason,
You are using different sizes for each image. Maybe this is causing the issue? Please try to upload all images in the same size.
Thanks for getting back to me so fast!
I tried re-doing these at all exactly 400×150, and that fixed it on this page:
http://emailbroadcast.jasoncox.co/adventure-travel/
but when i did it on this page:
http://emailbroadcast.jasoncox.co/furniture-retailers/
it does not. any idea?
I also noticed that in the json download, it adds a class of et_pb_row_fullwidth but the tutorial does not – not sure if that makes a difference.
Thanks much!
It’s some issue with sizing. I can see in the console that the logo that does not stack properly has a different size. Try to recreate this section from scratch.. Make sure all logos have the same size. Or duplicate 1st logo and use it for the image that is not stacked properly to see if that helps.
Huh!
when i switched the module from a text module to an image module, it works.
thanks for the help!