Custom Divi Blurbs – Part 1

- You will need to have the Divi Theme by Elegant Themes installed.
- You can follow this tutorial or download Ready-To-Use Page Layout with CSS code embedded.

Add section and columns
- Add Standard Section and select 3 columns layout.
- Add Image and Blurb module to one column (we will be adding classes and edit settings of each module. After modules in 1st column are ready we will copy them to 2nd and 3rd column).

Apply classes for the columns
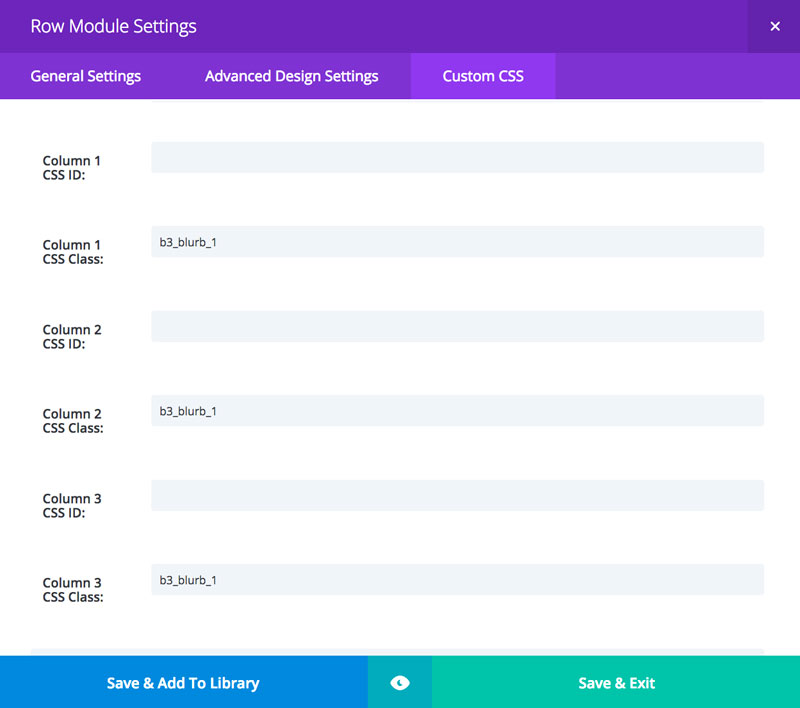
Add Image and edit module settings
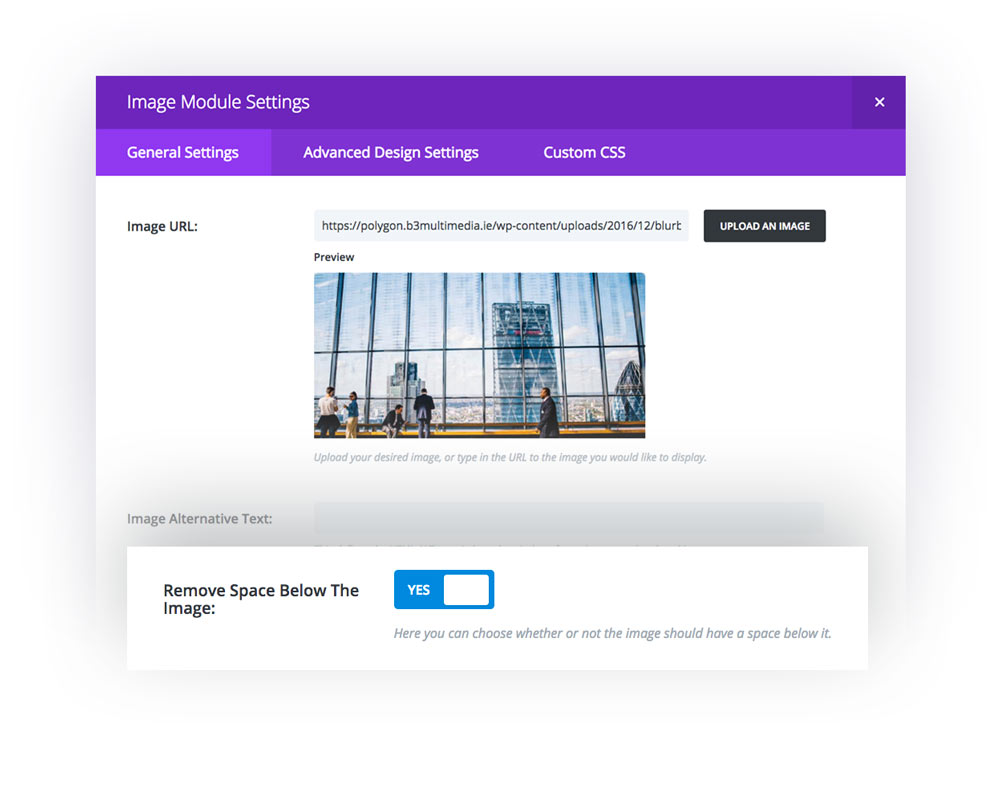
- Open Image Module settings and upload image.
- Scroll down and make sure that Remove Space Below The Image option is set to YES.
Editing Blurb Module Settings
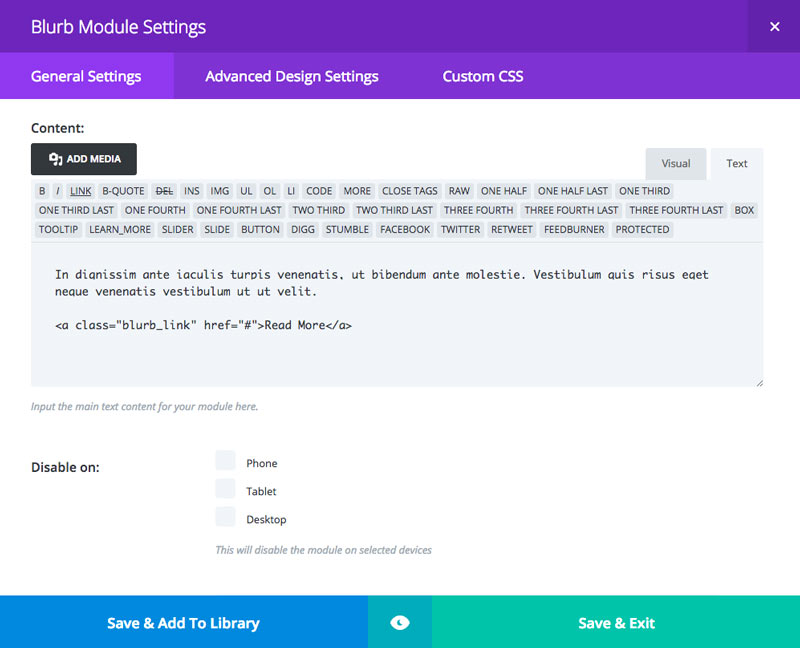
GENERAL SETTINGS
- Open Blurb Module Settings
- Add Title and URL
- Set Use Icon – YES and choose your icon
- Enable Circle Icon option and select colors for the icon and the circle
- Set Icon/Image Placement to Top
- Disable animation and set Text Orientation to Center
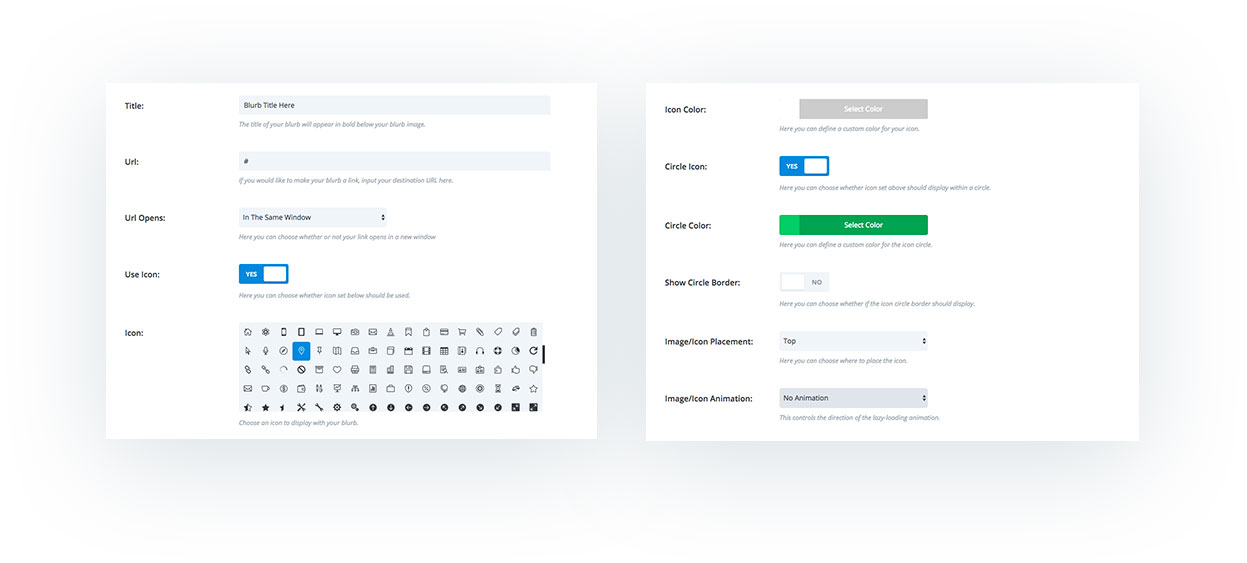
- Use Icon Font Size – YES
- Icon Font Size – 34px
- Header Font Size – 25px
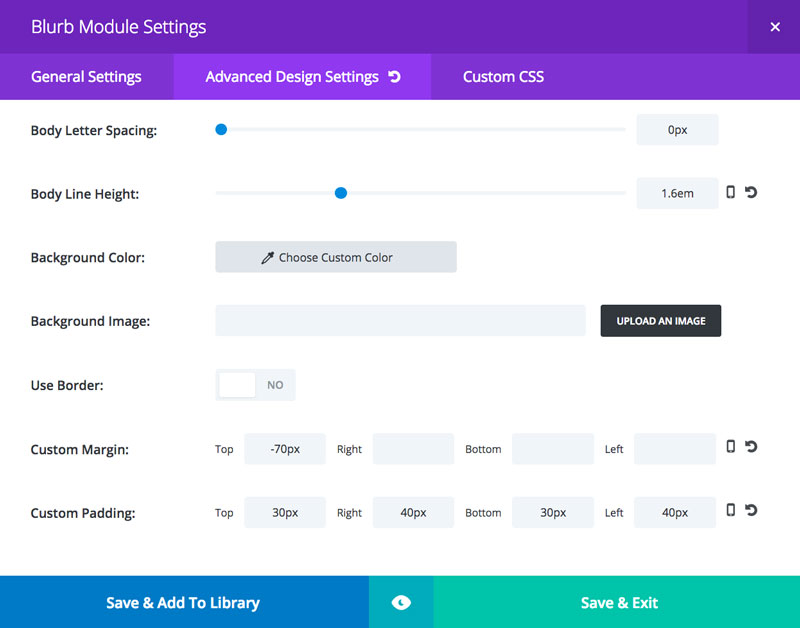
- Header Line Height – 1.4em
- Body Line Height – 1.6em
- Edit Margins and Paddings as follows:
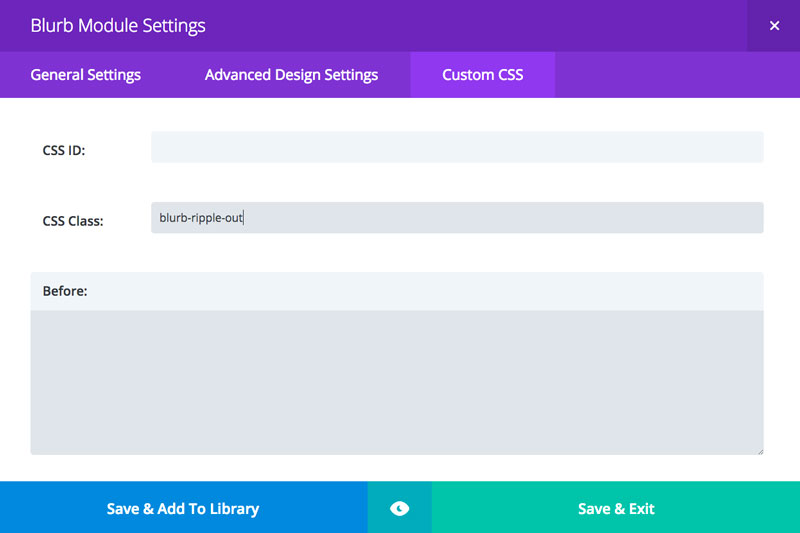

Adding CSS
For the Ripple-Out effect applied for all icons we need to add the following code:
|
1 2 3 4 5 6 7 8 9 10 11 12 13 14 15 16 17 18 19 20 21 22 23 24 25 26 27 28 29 30 31 32 33 34 35 36 37 38 39 |
/*------------------------------------------------------------------------*/ /*-------------------- BLURB RIPPLE EFFECT ------------------------------*/ /*------------------------------------------------------------------------*/ /* Ripple Out */ @-webkit-keyframes blurb-ripple-out { 100% { top: -12px; right: -12px; bottom: -12px; left: -12px; opacity: 0; } } @keyframes blurb-ripple-out { 100% { top: -12px; right: -12px; bottom: -12px; left: -12px; opacity: 0; } } .blurb-ripple-out .et-pb-icon { display: inline-block; vertical-align: middle; -webkit-transform: perspective(1px) translateZ(0); transform: perspective(1px) translateZ(0); box-shadow: 0 0 1px transparent; position: relative; } .blurb-ripple-out .et-pb-icon:before { content: ''; position: absolute; /* This is your ripple color & size */ border: #00cc69 solid 6px; /* Uncomment the line below if it's a circle*/ border-radius: 50%; top: 0; right: 0; bottom: 0; left: 0; -webkit-animation-duration: 1s; animation-duration: 1s; } .blurb-ripple-out:hover .et-pb-icon:before, .blurb-ripple-out:focus .et-pb-icon:before, .blurb-ripple-out:active .et-pb-icon:before { -webkit-animation-name: blurb-ripple-out; animation-name: blurb-ripple-out; } |
|
1 2 3 4 5 6 7 8 9 10 11 12 13 14 15 16 17 18 19 20 21 22 23 24 25 26 27 28 29 30 31 32 33 34 35 36 37 38 39 40 41 42 43 44 45 46 47 48 49 50 51 52 53 54 55 56 57 58 59 60 61 62 63 64 65 66 67 68 69 70 71 72 73 74 75 76 77 |
/******* BLURB STYLES *******/ .b3_blurb_1 img { -webkit-transition: all .5s ease; -moz-transition: all .5s ease; -ms-transition: all .5s ease; -o-transition: all .5s ease; transition: all .5s ease; -ms-transform: scale(1.05); -webkit-transform: scale(1.05); transform: scale(1.05); -webkit-transform-origin: bottom; -moz-transform-origin: bottom; -ms-transform-origin: bottom; -o-transform-origin: bottom; transform-origin: bottom; border-radius: 10px 10px 0 0; -webkit-border-radius: 10px 10px 0 0; -moz-border-radius: 10px 10px 0 0; } .b3_blurb_1 { border: none !important; border-radius: 10px; -moz-border-radius:10px; -webkit-border-radius: 10px; -o-border-radius: 10px; overflow: hidden; width: 100%; position: relative; z-index: 1; -webkit-transition: all .5s ease-in-out; -moz-transition: all .5s ease-in-out; -ms-transition: all .5s ease-in-out; -o-transition: all .5s ease-in-out; box-shadow: 0 20px 100px rgba(212, 215, 217,.5); -webkit-box-shadow: 0 20px 100px rgba(212, 215, 217,.5); -moz-box-shadow: 0 20px 100px rgba(212, 215, 217,.5); -o-box-shadow: 0 20px 100px rgba(212, 215, 217,.5); } .b3_blurb_1:hover { box-shadow: 0 40px 100px rgb(212, 215, 217); -webkit-box-shadow: 0 40px 100px rgb(212, 215, 217); -moz-box-shadow: 0 40px 100px rgb(212, 215, 217); -o-box-shadow: 0 40px 100px rgb(212, 215, 217); } .b3_blurb_1:hover img { -ms-transform: scale(1.00) !important; -webkit-transform: scale(1.00) !important; transform: scale(1.00) !important; -webkit-transition: all 1000ms cubic-bezier(0.170, 0.690, 0.470, 0.995); -moz-transition: all 1000ms cubic-bezier(0.170, 0.690, 0.470, 0.995); -o-transition: all 1000ms cubic-bezier(0.170, 0.690, 0.470, 0.995); transition: all 1000ms cubic-bezier(0.170, 0.690, 0.470, 0.995); /* custom */ } .b3_blurb_1 .et_pb_main_blurb_image { margin-bottom: 20px; text-align: center; } /**** BLURB LINK ***/ .blurb_link { display: block; margin-top: 20px; text-transform: uppercase; font-weight: 700; letter-spacing: 0; -webkit-transition: all .4s ease-in-out; -moz-transition: all .4s ease-in-out; -ms-transition: all .4s ease-in-out; -o-transition: all .4s ease-in-out; } .blurb_link:hover { letter-spacing: 1px; -webkit-transition: all .4s ease-in-out; -moz-transition: all .4s ease-in-out; -ms-transition: all .4s ease-in-out; -o-transition: all .4s ease-in-out; } |
Maciej Ekstedt
Maciej is the founder and CEO of B3 Multimedia Solutions. He is a self-made web designer and marketing expert, and he loves his job so much that he barely leaves the office. He transforms creative ideas into effective strategies for his company and for his clients. Maciej is fascinated by the phenomenon of megalopolis. He notices patterns and details which make up the whole thing, and he uses these skills in his work.

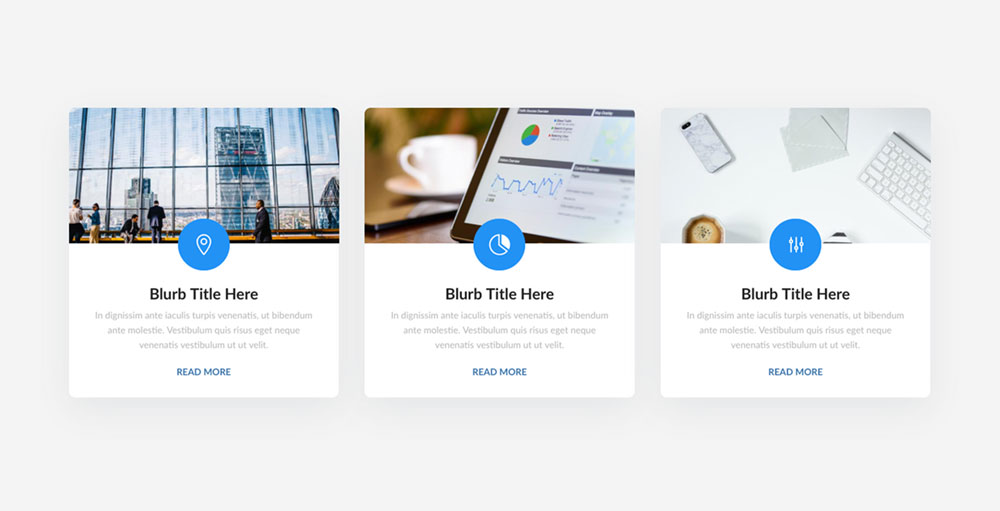
Blurb Title Here
In dignissim ante iaculis turpis venenatis, ut bibendum ante molestie. Vestibulum quis risus eget neque venenatis vestibulum ut ut velit. Read More

Blurb Title Here
In dignissim ante iaculis turpis venenatis, ut bibendum ante molestie. Vestibulum quis risus eget neque venenatis vestibulum ut ut velit. Read More
Blurb Title Here
In dignissim ante iaculis turpis venenatis, ut bibendum ante molestie. Vestibulum quis risus eget neque venenatis vestibulum ut ut velit. Read More


top work, i like it verry. thx for the freebie
Thank you Brend 🙂 I’m glad you like it. We will share 2-3 series more so stay tuned!
Hey! Thanks for the awesome blurbs. Question; how did you get that cta effect just above this comment section? can you share that trick please or point me to the direction?
Thanks in advance
App Mon’
Elegant Themes has published blog post about it:
How to Create an “Expanding” CTA like Elegant Themes
Great looking Blurbs and an easy to follow tutorial showing us how to do it.
Thanks for sharing Maciej 🙂
Hi Keith 🙂 I’m glad to hear that. I’m not a native english speaker. This tutorial has been released without any correction so it’s a beautiful feeling to hear it was easy to follow. Thank you for your comment!
Everything a tut should be 🙂 A demo, a download , and comprehensive easy to follow tutorial. Thanks for this. Look forward to more 🙂
Andy
Thanks Andy. I’m glad you like it 😉
Just Wow! This is the kind of tutorial the ET blog just have. Thanks a lot!
Just Wow! This is the kind of tutorial the ET blog should have. Thanks a lot!
Lovely! Thanks for sharing
Really love this great tutorial.
Thanks for sharing. Can’t wait to see more of this.
Stunning – like others have mentioned in the comments, this should be the standard for how tutorials are delivered – makes learning a lot easier! The design of the blurbs is beautiful. Looking forward to the rest of the series. Thank you.
Thank you Al! Our goal is not just to generate traffic, but to deliver valuable content.
Great blurbs really! thank you for making this a freebie.
Beautiful work, and many thanks!
Wow, really cool and thanks for sharing it!
Love your work!
Thank you Maciej, I’ve just found your site through a Divi FB group and used this for a new site I’ve started on today. It’s brilliant and I really look forward to the other tutorials in the series!
Not being too much of a coder, I wondered if it would be too hard to have the icon circles as three different colors – the border color setting in the CSS being the limiting factor?
/* This is your ripple color & size */
border: #00cc69 solid 6px;
Thanks once again,
Alan
Hi Alan,
Thank you for your comment. This is good question 🙂 Unfortunately this code provides only one effect. To create another color and apply for specific icon custom work would be required.
Hi Maciej,
Thanks for taking the time to get back to me. After trying quite a few different things I couldn’t get the ripple affect to work with different colored icons and so decided to forgo the ripple affect for now as I decided that different color icons were my more important.
Thanks again for taking the time to respond, and for sharing this customization in the first place, I appreciate it. All the best.
Alan
Hi Alan, sorry to hear you could not change the ripple color. It seems it was caching issue only. If you would like to try again, make sure you clear browser cache and refresh page after changes are applied 🙂
Love this post, very easy to follow. Did wonder, though, if many of the things defined in px should be in relative units instead so that the design properly scales across different sized displays.
Hello Patrick. Thank you for your comment. Please notice, this blurbs looks great on all devices 🙂 Let me know if you have any other questions.
Hi, I see that everyone’s having success with your tutorial, but for some reason I’m struggling with making the code work. How can I go about getting help?
I could give you the url, but it isn’t live and there are multiple log ins through flywheel to get to it.
hmmm??
Hey Korrie, unfortunately we cannot help you if make it working if you are on localhost. If you can share your live site url with wp-admin credentials then please send it to [email protected] and we will see what we can do.
Awesome tutorial! Thank you!
Hi. I really like the way these blurbs look – great work and instructions! The layout gave me an idea for a current client’s website. One of his blurbs will be a condensed version of a surf report which he updates daily. I’m wondering if there is some way to make the icon that shows up be dynamic. He adds a rating every day which displays a number from 1-10 on how good the surf is. It’d be really cool if the icon on the homepage blurb would pull the corresponding surf rating number from his report. Any idea if this is possible? Thank you for putting any thought into this at all 🙂
Hi Tricia, I think Custom Post Type would have to be used. Not sure exactly how 🙂 but this would be the direction.
Thank you for this great tutorial!
Hi! What do I have to do if I want to have, let’s say, 4 blurbs? The fourth one will not be white anymore. Please advise! Screenshot: http://pasteall.org/pic/index.php?id=118986
Thanks!
Steve
I love your tutorial, I was able to make it work, but I would like to have 4 blurbs or more. Please advise! see above.
Thanks!
Hi Stevie, I’m glad to hear you made it working 🙂 I think you need to go to row settings and add white background to 4th column.
Thank you that’s it! Now it looks great!
Great blurb layout. The coolest thing about this is that the CSS coding is all in one place so we can keep tabs on this and adjust colours etc.. with ease. Many thanks, guys appreciated greatly.
Thank you Brian! I’m glad you like it 🙂
Hi Maciej. This is really a wonderful tutorial and thank you so much for this. But I’m having a little problem on mine, it seems like my blurb icon and the circle background is not centered compared to the one on your tutorial. I know you’re super busy, but I hope you can teach me on where to adjust to make it center. http://prntscr.com/hj7psr
Thank you
Hi Jude,
I’m glad you like this tutorial 🙂 Answering your question, you need to apply negative margin to the icon. Open CTA Module Settings, go to Advanced tab and apply margin-top: -20px; in the Image/Icon field. Hopefully it helps 🙂
Thank you for the layout & tutorial! I added it to a current project and I love how it moves.
You welcome Sara! 🙂
Hi, I like these blurbs very much. Thank you. The only thing: I cannot adjust the font-size within the module for mobile view. I have the problem that the words break instead of getting smaller. Is there a solution for that.
Once again: thank you!
Sophie
Hi Sophie! I’m glad you like it! The issue with mobile font size must be Divi issue or module settings issue because this tutorial/CSS code does not apply any styling for the titles font. You may want to check module settings once again and see if you edit proper heading options. If you still would not be able to edit that font, you should contact ET support and I’m sure they will help you sort it out. Hopefully this helps.
Ok, thanks for your answer!
Hallo B3 Team, really great tutorial and I love these Blurbs, thank you for that! The only problem I have after using it on my website on the homepage, browsers say that my site is insecure because of flash? After deactivating the section in Divi the site is secure again. Do you have an idea how to make the side secure using the blurbs?
Dear Murat,
It has nothing to do with our blurbs tutorial. This tutorial also does not use flash (who use flash today?)… Please fix the image urls to https and it should work. As long as you use http, site won’t be marked as secure – https://imgur.com/a/Ef6ZY
Great tutorial! Thanks a lot for making it simple on people like me!
This works beautifully! Thanks for the great tips and CSS.
Outstanding resource. This actually solved an unrelated image sizing issue/question for us. Are you finding the need to create CSS for all blurb modules for mobile? It seems we are experiencing bleed issues with imagery, for client designs, when using the blurb module.
Heyyy, do you have tutorial on building a broken layout website with Divi? TIA.
Hello,
This article from ET might be helpful – The Secret to Designing Broken Grid Layouts in Divi
Hi! Do you use a plugin for your related posts section? I really like its design.
Hello Marien,
No, it is custom solution with ACF plugin 🙂
Hey, when I use your layout, the image/blurb doesn’t have rounded corners like yours. How do I apply to both?
Here’s a link – https://lampstandinc.com/initiativesall/
Can’t get the animation to work for some reason. I added all the CSS into the Divi Theme Options.
Hi Jeff,
You must be missing something 🙂 I have checked your page… I don’t see custom CSS to be loaded. Are you using any caching plugin? Or maybe try to clear Divi Builder cache in Divi/Theme Options/Builder/Advanced? All you need to do is to make sure your custom CSS is loaded on front end.
Regarding border-radius.. I believe you can set it up in Blurb module settings (Design/Border). Hopefully this helps!
Really nice layout and excellent content , absolutely nothing else we need : D.
Excellent blog here! Also your site loads up very fast! What web host are you using? Can I get your affiliate link to your host? I wish my site loaded up as fast as yours lol
I love the blurb-ripple-out effect on icons. If you try to add your own icon via the blurb upload image the animation doesn’t work. Any ideas on how to modify so this works for uploaded images(if we don’t want to use the icons).
So nice and simple tutorial, that even I can understand 🙂 just uploaded the file and published the blurbs – looks great! Thanks for sharing. Wondering if it is possible to go with only one CTA in the blurb, meaning change the icon to a read more buttom with the same animation and in the text get rid of the ‘read more’?