How to Customize Divi Portfolio Module

Portfolio is a very important part of every business website. Customers want to see some samples of our work before they will hire us so it is crucial to showcase our work in a pleasant way.
As you know, default Divi Portfolio Module isn’t too attractive but it’s highly customizable. We can change colors, font sizes, overlay icon and overlay color in module customizer but what if we want to add some text animations or repositioning elements? Well we can do that too. With a few lines of CSS we can transform default Divi Portfolio module into a nice Portfolio section with hover effects and animations that will attract your potential customers.
In this tutorial I will show you how to customize Title and Meta Texts. We will hide them by default and make them sliding down on mouseover. We will also add a custom background overlay using CSS brightness filter, so when user hover on portfolio item he will be able to easily read texts. Let’s get started!
- You will need to have the Divi Theme by Elegant Themes installed.
- You can follow this tutorial or download Ready-To-Use Divi Builder section with CSS code embedded.


Add Portfolio items
First thing we need to do is to add Portfolio items to our website so they will be displayed when we use Portfolio module.
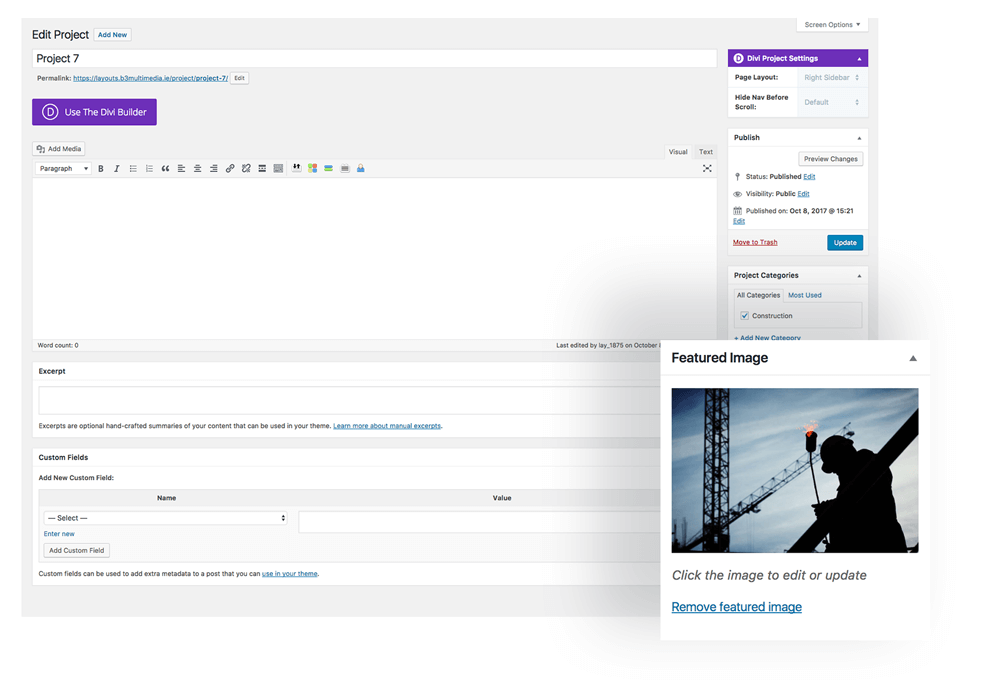
- Go to Projects/Add New
- Name your project and upload Featured Image
- Click Publish
* You can also add project description and more images however for this tutorial we only need Featured Images setup.
Add Section, Row and Portfolio Module
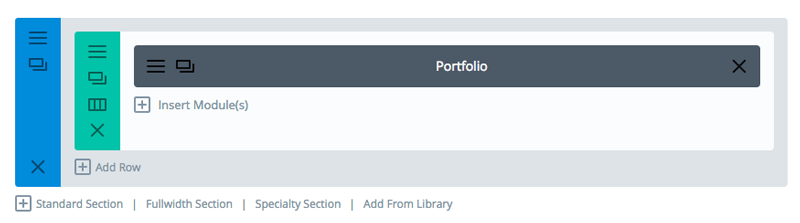
For this tutorial we will add row with 1 column and we will place Portfolio Module inside it.
- Add new Standard Section and select 1 column layout
Apply CSS Class and customize Row Settings
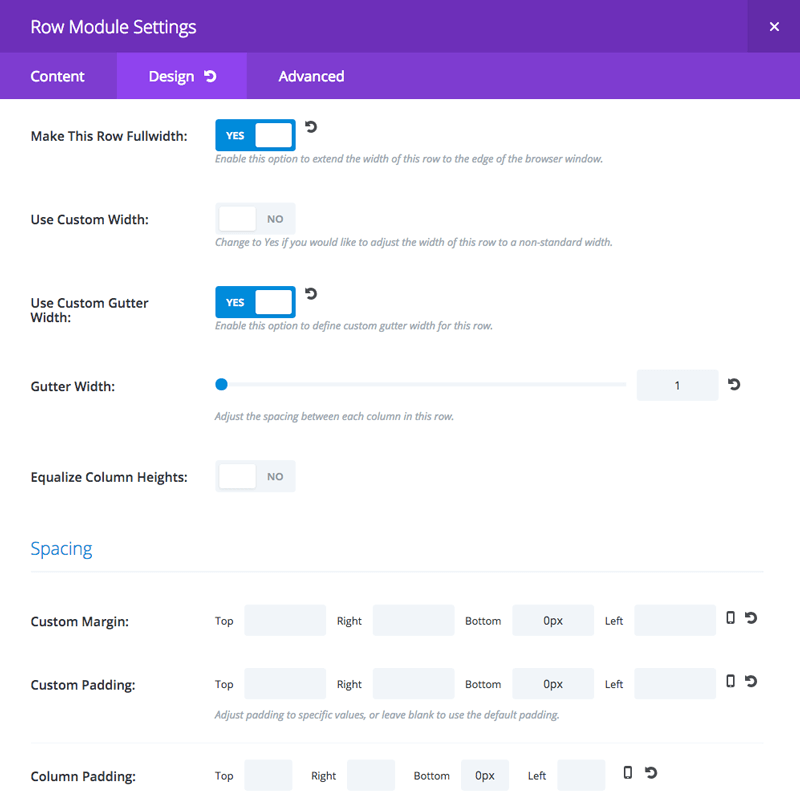
In this step we need to apply a few settings that will make our section full width and remove spaces between images. We will also add class that will apply Custom CSS to our Portfolio Module.
1. Open Row Module Settings and in Design tab set the following options:
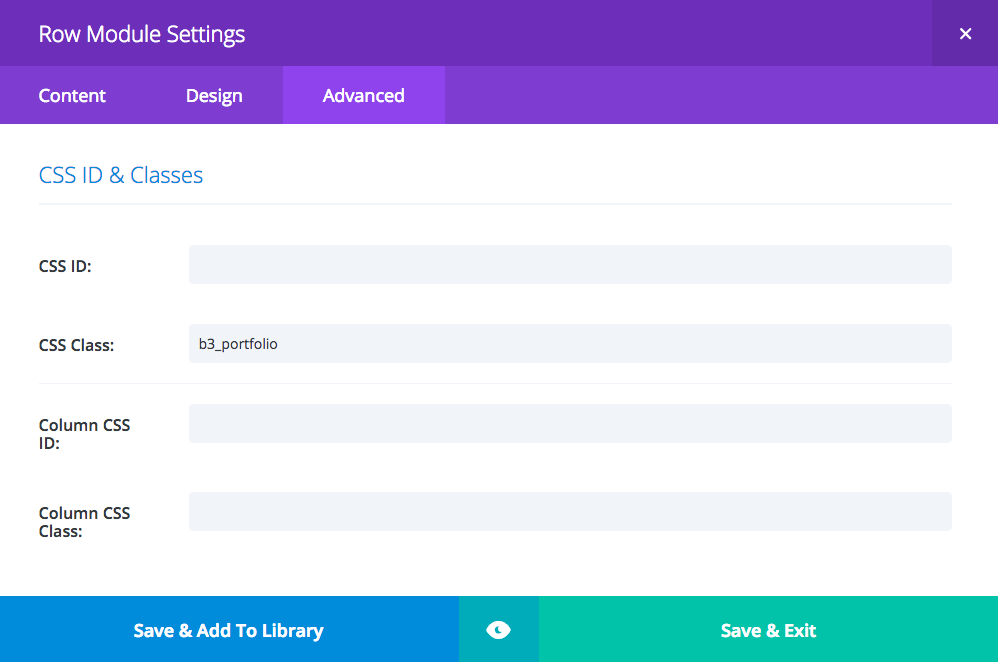
2. Go to Advanced tab and add CSS Class b3_portfolio
Customize Portfolio Module
Open Portfolio Module Settings and customize as following:
- In Content tab set Pignation OFF (optionally)
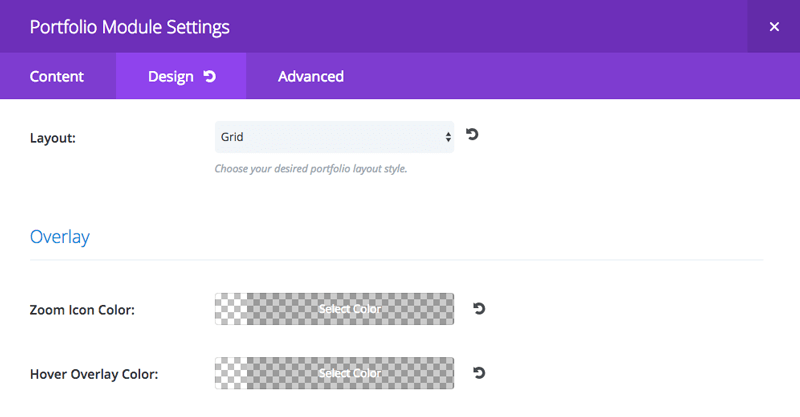
- Go to Design tab and select Grid Layout
- Set Zoom Icon and Hover Overlay Color to transparentFor this tutorial we don’t want to display icon however you can experiment. Background must be transparent because we will use custom CSS Brightness Filter to execute dark image hover effect.
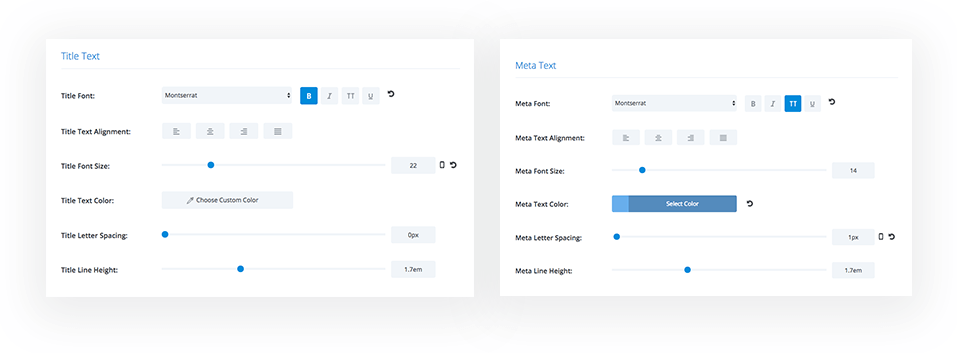
3. Set Text Color to White and Text Orientation to Center
4. For Title Text we use Montserrat font with Bold option enabled.
5. For Meta Text enable Uppercase Mode and add 1px Letter Spacing.
Adding CSS
In this last step we will add some CSS to the Divi/Theme Options/Custom CSS section or you can just copy and paste it in to your style.css file located in your child theme folder – Appearance/Editor. Make sure to save your work.
|
1 2 3 4 5 6 7 8 9 10 11 12 13 14 15 16 17 18 19 20 21 22 23 24 25 26 27 28 29 30 31 32 33 34 35 36 37 38 39 40 41 42 43 44 45 46 47 48 49 50 |
/*** B3 PORTFOLIO ***/ .b3_portfolio .et_pb_portfolio_grid .et_pb_portfolio_item h2, .b3_portfolio .et_pb_portfolio_grid .et_pb_portfolio_item:hover h2, .b3_portfolio .et_pb_portfolio_grid .et_pb_portfolio_item .post-meta, .b3_portfolio .et_pb_portfolio_grid .et_pb_portfolio_item:hover .post-meta, .b3_portfolio .et_pb_portfolio_grid .et_pb_portfolio_item:hover img, .b3_portfolio .et_pb_portfolio_grid .et_pb_portfolio_item img { -webkit-transition: all .6s ease-in-out; -moz-transition: all .6s ease-in-out; transition: all .6s ease-in-out; } .b3_portfolio .et_pb_portfolio_grid .et_pb_portfolio_item h2 { opacity: 0 !important; transform: translateY(-140px); position: absolute; margin: auto; width: 100%; } .b3_portfolio .et_pb_portfolio_grid .et_pb_portfolio_item .post-meta { opacity: 0 !important; transform: translateY(-130px); position: absolute; margin: auto; width: 100%; } .b3_portfolio .et_pb_portfolio_grid .et_pb_portfolio_item:hover h2 { opacity: 1 !important; transform: translateY(-120px); } .b3_portfolio .et_pb_portfolio_grid .et_pb_portfolio_item:hover .post-meta { opacity: 1 !important; transform: translateY(-90px); } .b3_portfolio .et_pb_portfolio_grid .et_pb_portfolio_item:hover img { filter: brightness(40%) ; } @media only screen and (max-width: 980px) { .b3_portfolio .et_pb_portfolio_grid .et_pb_portfolio_item h2, .b3_portfolio .et_pb_portfolio_grid .et_pb_portfolio_item .post-meta { width: 33.3%; } } @media only screen and (max-width: 768px) { .b3_portfolio .et_pb_portfolio_grid .et_pb_portfolio_item h2, .b3_portfolio .et_pb_portfolio_grid .et_pb_portfolio_item .post-meta { width: 50%; } } @media only screen and (max-width: 480px) { .b3_portfolio .et_pb_portfolio_grid .et_pb_portfolio_item h2, .b3_portfolio .et_pb_portfolio_grid .et_pb_portfolio_item .post-meta { width: 100%; } .b3_portfolio .et_portfolio_image img { width: 100%; } } |

Maciej Ekstedt
Maciej is the founder and CEO of B3 Multimedia Solutions. He is a self-made web designer and marketing expert, and he loves his job so much that he barely leaves the office. He transforms creative ideas into effective strategies for his company and for his clients. Maciej is fascinated by the phenomenon of megalopolis. He notices patterns and details which make up the whole thing, and he uses these skills in his work.
Get Divi Icons PRO today!
We have a sweet deal for you! You can get the best icon plugin for Divi with a 10% discount! Use the coupon code DIVIICONS10 at checkout!


Just the way tutorials should be… Clear, concise, with pictures so no confusion. Good tutorial with a nice effect. Thanks very much for your efforts. I really like your work.
All the best
Andy
Hi Andy. Thanks for the comment 🙂
Hello. Is there a way to make this in “masonry” style?
Although I still work with Divi every day, maintaining and creating sites still….I haven’t been hanging in the community much….and I still make it a point to catch your tut’s and share them back onto the socials I crawl.
Absolutely love your work and appreciate the time you save me.
Hey Dehn,
It’s a pleasure to create something nice and share with the community. I’m glad you like it 🙂
How do you make, upon click, to view larger image?
Hi Kate, Divi Portfolio module opens project page by default. You could instead use Gallery module to open image lightbox. You would have to tweak CSS, replace this:
.et_pb_portfolio_grid .et_pb_portfolio_item
with this:
.et_pb_gallery_grid .et_pb_gallery_item
Hi Maciej, I’m sought of a newbie when it comes to Divi but i can make my way around to tweak and fix. I want to go a bit deeper on Kate’s Question. I would love to do what you did above with the filterable effect, but would love to just have people click on the image and just have it zoom foward without going to Project page. Could you explain a bit better on how to do this ? Example
1. create child theme
2. place this code in this folder
3. place this code in this folder
4. use this moduler
Thanks in advance
Hi Antonio 🙂
For sure it is possible. You would only have to use Gallery Module for that but CSS to apply this effect to the Gallery module would be slightly different. Unfortunately we do not have a tutorial on how to add it to Gallery Module yet, but this is something we can work on soon 🙂
Hi Maciej,
This is a great tutorial, exactly the way I would like to do my portfolio.
Thank you,
Mitch
hi – will this customisation work for a filterable portfolio section, ‘as is’?
thanks
Unfortunately not Olly. It won’t work with filterable portfolio module “as it is” and some tweaks would have to be applied.
Excellent.
I´ve been searching for a solution like this and yours was the easiest and more effective.
Thanks.
Hi, I’m very happy with your work, I think the divi theme people should pay more attention to the filterable portfolio module that does not have the option to customize the menus and effects in the images …
Thank you for your attention
Very nicely done. Is there a way to add the category menu above the grid? And can a portfolio item in the grid link to a URL, not the project page?
Great tutorial, makes me want to upgrade my existing portfolio modules 🙂
Amazing! Thank you so much, my portfolio page has driven me mental for years (yes, years!) It was always just meh 😐 Now I am so happy with it thanks to you and your wonderful tutorial 🙂
Hi,
Thank You for tutorial,
It works, but still align to left, I have only 3 items in row and need align it to center.
How resolve it?
https://imgur.com/a/4ArpxX6
Hi Henry,
Divi by default display 4 images in Portfolio module. To change default Divi settings and display only 3 items you would need some custom coding and several fixes to make it responsive. I believe the best and the easiest solution is to add one more image and have finally 4 images for this module.
Hold the phone… I added the css identifier to the module not the row. It works now. I juts have to edit the spacing of the title and meta. When my title is too long it overlaps into the meta.
You mentioned a description could be added? I’ve been messing with it, but I can’t seem to figure out how. Any pointers?
Well done. I wish all tutorials were laid out like this.
Hi there. Great tutorial. I now have my portfolio displaying in a grid, and I have added small borders to suit the site. What I can’t get to work is the hover effect. I have followed all the steps? Any ideas what could be causing this?
https://www.theweddingplannerswhitsundays.com
Hello,
It seems that you have used Filterable Portfolio module on your website. Unfortunately this tutorial explains how to apply this effect to Portfolio module. To make it working with Filterable Portfolio module, some classes in CSS would have to be changed.
Hello, would you tell us which classes should be changed in order to work with filterable portfolio?
I just modified the code to work with the Filterable Portfolio module, with a few tweaks to fit the design of the site I’m working on. Not sure how it looks on mobile yet, but it’s a start. You can see it in action here: http://talleya.wpengine.com/work/
/*** B3 PORTFOLIO ***/
.b3_portfolio .et_pb_portfolio_item .et_pb_grid_item h2.et_pb_module_header, .b3_portfolio .et_pb_portfolio_item .et_pb_grid_item:hover h2.et_pb_module_header, .b3_portfolio .et_pb_portfolio_item .et_pb_grid_item p.post-meta, .b3_portfolio .et_pb_portfolio_item .et_pb_grid_item:hover p.post-meta, .b3_portfolio .et_pb_portfolio_item .et_pb_grid_item:hover img, .b3_portfolio .et_pb_portfolio_item .et_pb_grid_item img {
-webkit-transition: all .6s ease-in-out;
-moz-transition: all .6s ease-in-out;
transition: all .6s ease-in-out;
}
.b3_portfolio h2.et_pb_module_header {
display: none;
position:relative;
margin-top: -140px!important;
padding: 0 10px!important;
z-index: 999999!important;
}
.b3_portfolio p.post-meta {
display: none;
position:relative;
margin-top: 0px!important;
padding: 0 10px!important;
z-index: 999999!important;
}
.b3_portfolio .et_pb_portfolio_item:hover h2.et_pb_module_header {
display: block;
}
.b3_portfolio .et_pb_portfolio_item:hover p.post-meta {
display: block;
margin-bottom: 30%;
}
.et_portfolio_image:hover .et_overlay {
display: none;
}
.b3_portfolio .et_pb_portfolio_item {
background-color: #8ebd3e!important;
overflow: hidden!important;
max-height: 227px!important;
}
.b3_portfolio .et_pb_portfolio_item:hover img {
opacity: 0.6!important;
/*filter: blur(5px);
-webkit-filter: blur(5px);*/
}
@media only screen and (max-width: 980px) {
.b3_portfolio .et_pb_portfolio_item .et_pb_grid_item h2.et_pb_module_header, .b3_portfolio .et_pb_portfolio_item .et_pb_grid_item p.post-meta {
width: 33.3%;
}
}
@media only screen and (max-width: 768px) {
.b3_portfolio .et_pb_portfolio_item .et_pb_grid_item h2.et_pb_module_header, .b3_portfolio .et_pb_portfolio_item .et_pb_grid_item p.post-meta {
width: 50%;
}
}
@media only screen and (max-width: 480px) {
.b3_portfolio .et_pb_portfolio_item .et_pb_grid_item h2.et_pb_module_header, .b3_portfolio .et_pb_portfolio_item .et_pb_grid_item p.post-meta {
width: 100%;
}
.b3_portfolio .et_portfolio_image img {
width: 100%;
}
}
Great work Matthew 🙂
Hi Matthew,
I used the code you posted and it works great. Any update on it working better for mobile?
All you need to replace is all instances of “.et_pb_portfolio_grid” change to “.et_pb_filterable_portfolio_grid” and it works with filterable portfolio.
The code you posted doesn’t work for me, it does overlay a green color but the transition does not work. but there’s no need to use all kinds of different classes, you just need to find the ones that are different from the regular portfolio.
Just what the Dr. ordered! Thank you!
I cannot get this to work with the latest Divi 4.0.11. Can you confirm if this is no longer a viable option. This is the third tutorial/layout I’ve tried and none of them work on my configs.
Hello,
We have just checked and it works fine. Our demo page is running the latest WP and Divi 4.0.11. Please check here – https://layouts.b3multimedia.ie/divi-tutorials/divi-portfolio-section/
You must be doing something wrong. I would suggest to download json file, import it to your Divi Library and then load the section to the page where you want to use it. It should work.
Hello there, I am trying to download the json file after I subscribe to your mailing list, and it’s not working. I am just redirected to your homepage it seems. Is the link broken? Thank you!
Hello Jeff,
We were migrating our hosting and there was some issue. It should be fixed now. Please try again.
Hey, awesome tutorial and works great, I’m just wondering if there’s a way to have a 50% transparent coloured overlay, rather than black?
Hey,
Unfortunately not. This effect is using brightness CSS filer on hover which is set to 40% on hover. You could maybe try to use some other filters to achieve different effect.
You would need to tweak the following CSS:
.b3_portfolio .et_pb_portfolio_grid .et_pb_portfolio_item:hover img {
filter: brightness(40%) ;
}
Here are some other CSS filters samples – https://developer.mozilla.org/en-US/docs/Web/CSS/filter
Great! Thanks for the reply.
I’ve managed to get the effect I wanted by changing the code to:
.b3_portfolio .et_pb_portfolio_grid .et_pb_portfolio_item:hover img {
opacity:.5;
}
And adding a background colour to the portfolio module. It fades nicely to a transparent blue, and text is nice and white over the top.
I’ve tweaked the code and used it for filterable portfolio.
All I did was compared the two codes from the two portfolio modules together and there is one difference in class.
Regular portfolio: uses class “.et_pb_portfolio_grid”
Filterable portfolio: uses class “.et_pb_filterable_portfolio_grid”
So if you replace all instances of et_pb_portfolio_grid with et_pb_filterable_portfolio_grid it works like a charm!
CODE:
/*** FILTERABLE PORTFOLIO OVERLAY ***/
.b3_portfolio .et_pb_filterable_portfolio_grid .et_pb_portfolio_item h2,
.b3_portfolio .et_pb_filterable_portfolio_grid .et_pb_portfolio_item:hover h2,
.b3_portfolio .et_pb_filterable_portfolio_grid .et_pb_portfolio_item .post-meta,
.b3_portfolio .et_pb_filterable_portfolio_grid .et_pb_portfolio_item:hover .post-meta,
.b3_portfolio .et_pb_filterable_portfolio_grid .et_pb_portfolio_item:hover img,
.b3_portfolio .et_pb_filterable_portfolio_grid .et_pb_portfolio_item img {
-webkit-transition: all .6s ease-in-out;
-moz-transition: all .6s ease-in-out;
transition: all .6s ease-in-out;
}
.b3_portfolio .et_pb_filterable_portfolio_grid .et_pb_portfolio_item h2 {
opacity: 0 !important;
transform: translateY(-140px);
position: absolute;
margin: auto;
width: 100%;
}
.b3_portfolio .et_pb_filterable_portfolio_grid .et_pb_portfolio_item .post-meta {
opacity: 0 !important;
transform: translateY(-130px);
position: absolute;
margin: auto;
width: 100%;
}
.b3_portfolio .et_pb_filterable_portfolio_grid .et_pb_portfolio_item:hover h2 {
opacity: 1 !important;
transform: translateY(-120px);
}
.b3_portfolio .et_pb_filterable_portfolio_grid .et_pb_portfolio_item:hover .post-meta {
opacity: 1 !important;
transform: translateY(-90px);
}
.b3_portfolio .et_pb_filterable_portfolio_grid .et_pb_portfolio_item:hover img {
filter: brightness(40%) ;
}
@media only screen and (max-width: 980px) {
.b3_portfolio .et_pb_filterable_portfolio_grid .et_pb_portfolio_item h2, .b3_portfolio .et_pb_filterable_portfolio_grid .et_pb_portfolio_item .post-meta {
width: 33.3%;
}
}
@media only screen and (max-width: 768px) {
.b3_portfolio .et_pb_filterable_portfolio_grid .et_pb_portfolio_item h2, .b3_portfolio .et_pb_filterable_portfolio_grid .et_pb_portfolio_item .post-meta {
width: 50%;
}
}
@media only screen and (max-width: 480px) {
.b3_portfolio .et_pb_filterable_portfolio_grid .et_pb_portfolio_item h2, .b3_portfolio .et_pb_filterable_portfolio_grid .et_pb_portfolio_item .post-meta {
width: 100%;
}
.b3_portfolio .et_portfolio_image img {
width: 100%;
}
}
Thanks for the great tutorial 🙂 I’m really happy now with a great portfolio effect.
Regards,
Mirna