How To Add Social Media Icons to the Divi Primary Menu

Adding social media icons to your Divi website’s menu is a fantastic way to give your site a unique appearance and feel. Furthermore, by providing your audience with a logical and clear direction on how to follow your business, blog or brand in various social media platforms is an excellent strategy for improving your site’s user experience.
By default, the social media sharing icons of the Divi theme are set in its footer and in its secondary menu bar if you enabled it (Divi → Theme Options → General). But if you are one of those people who prefer to showcase them in your main menu instead of your site’s header and footer, then you will find this tutorial quite helpful.
The Importance of Adding Social Media Icons to your Primary Menu
In most cases, social media platforms and websites complement each other. Not all content being shared through your website will appear on social media platforms, and the same goes the other way around. Thus it is highly recommended to promote your site on its social media counterparts and vice versa.
Most of the time, your target audience may find your website an unfamiliar territory, so you would want them to interact with your brand or company in a way that they are very familiar with. Compared to social media channels, the communication limitation of your website is far bigger. The majority of online users have already depended on Twitter and Facebook for information on things and topics which they find relevant.
Here are two reasons why you should incorporate social icons on your primary menu:
✓ It will be easier for your visitors to find them and follow you.
You want your social media icons to be as visible to your audience as possible. It should be effortless for your visitors to find them in your site and placing them in your main menu will make a whole world of difference. Throughout a visitor’s stay on your site, your primary menu follows them. There is no need for them to look for those icons, they are already there and with a single click, your visitors will be able to access your social media channels.
✓ Triggers call to action.
Both your site and social media platforms have one goal and that is to inform potential leads and to draw them into the products or services you are offering. Their curiosity is more likely to be triggered the more they are faced with them.
Different Methods of Adding Social Icons
Add social icons using FontAwesome
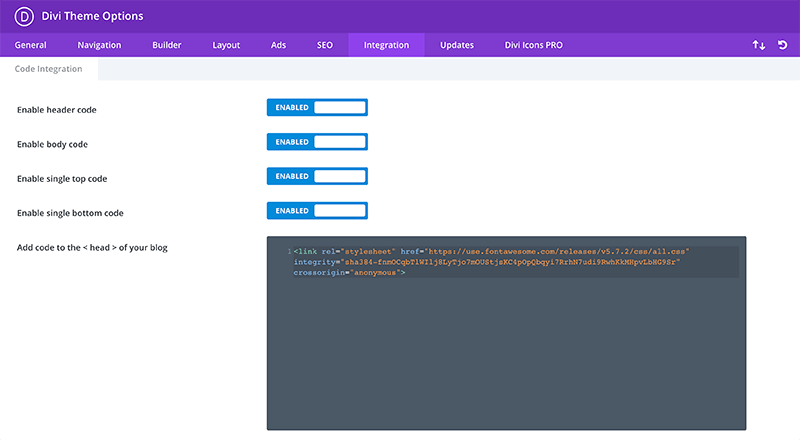
For this method, you need to install Font Awesome first in your WordPress site. You can do that manually by going to Divi → Theme Options → Integration, and then copy/paste the code below in the <head> section:
<link rel=”stylesheet” href=”https://use.fontawesome.com/releases/v5.7.2/css/all.css”>
Alternatively you can install Divi Icons PRO plugin. This plugin features more than 2500 icons and adds not just FontAwesome to your Divi website but Google Material Design Icon and 360 Custom Styles icons as well. The icons are high-quality, pixel-perfect, and customizable. You can change its color, size, and add a border or a circle to fit your brand or the overall look of your site.
Whatever method you use, Font Awesome should be now incorporated to your site. You will be able to add the social media icons (and not only) to your Divi menu by following these steps:
1) Create Menu
If you haven’t created a menu yet, create one by going to the WordPress Admin Panel, then navigate to Appearance → Menus, and add the pages of your site. When adding social icons to your primary menu, you can decide wherever you want them to show up. You can place them before the pages, but most of the time they’ll be after them.
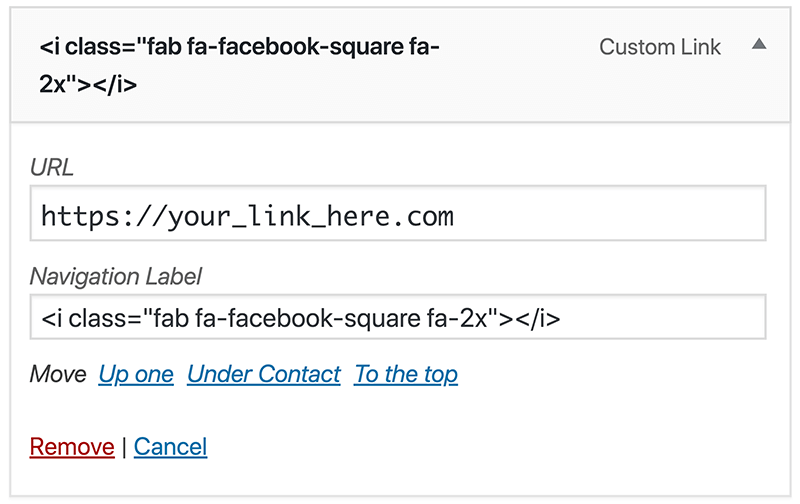
2) Add social media network link
Open the option for Custom Links. Here you will see the URL and Navigation Label fields. Type in the link of your social media channel in the URL field.
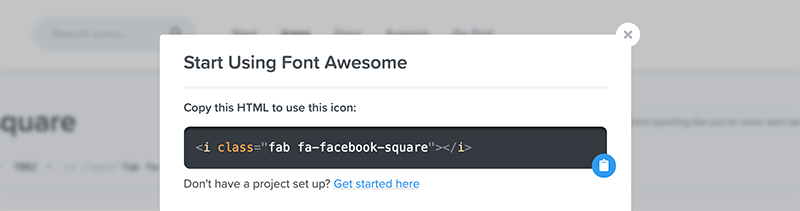
3) Copy the code of the social media icon from FontAwesome site
Go to the Once you clicked on an icon, it will giveyou the code below (this one is an example link for Facebook icon) which you will copy and paste in the Navigation Label field.
<i class=”fab fa-facebook-f”></i>
Font Awesome has a number of built-in customizations such as increasing its size. The below code will render the “Facebook” icon in bigger size that will look better in our menu. The code will look like this:
<i class=”fab fa-facebook-f fa-2x”></i>
Repeat the whole process on all the social icons you want to add in your site’s primary menu.
Please note that you will apply the same process to all the social icons you want to include on your primary menu. The only elements that will be different are the icons itself, HTML code, and its URL.
Changing social media icons appearance.
You can change your primary menu’s appearance as well as the social media icons through the Theme Customizer by navigating to Header & Navigation → Primary Menu Bar. Since we are utilizing a font instead of images to make everything work, all the changes you will make in the Divi options for your site’s primary menu will also be applied to the social icons. For example, changing the color of your primary menu to blue will also set all your social icon’s color to blue.
For more advanced customization we need to add custom CSS to Divi→ Theme Options→ Custom CSS. For this tutorial I will add different color for each social media icon and hover animation.
|
1 2 3 4 5 6 7 8 9 10 11 12 13 14 15 16 17 18 19 20 21 22 23 24 25 26 27 28 29 30 |
/* Icon Colors */ #main-header .fa-facebook-square {color: #4267b2;} #main-header .fa-twitter-square {color: #1da1f2;} #main-header .fa-pinterest-square {color: #e60023;} #main-header .fa-youtube-square {color: #ff0000;} #main-header .fa-linkedin {color:#0077B5;} /* Reduce Space Between Icons */ #top-menu li .fa-facebook-square, #top-menu li .fa-twitter-square, #top-menu li .fa-pinterest-square, #top-menu li .fa-youtube-square { margin-right: -15px; } /* Hover Effect */ #top-menu li .fa-facebook-square:hover, #top-menu li .fa-twitter-square:hover, #top-menu li .fa-pinterest-square:hover, #top-menu li .fa-youtube-square:hover, #top-menu li .fa-linkedin:hover:hover { transform: translateY(-5px); transitions: all .3s ease-out; } #top-menu li .fa-facebook-square, #top-menu li .fa-twitter-square, #top-menu li .fa-pinterest-square, #top-menu li .fa-youtube-square, #top-menu li .fa-linkedin { transition: all .3s ease-out; } |
Open Social Media link in new window.
You can also set your social icons to open up in a new tab. Of course, you would still want your visitors to stay on your site even though you are redirecting them to your social media channels. It is essential that both interactions are active. Here is how to do this:
1) Go back to the previous menu you created.
2) Delete the URL you typed into the URL field and using Facebook as an example, paste the following code into the navigation URL alternatively:
<a href=”http://www.facebook.com” target=”_blank”><i class=”fab fa-facebook-f fa-2x”></i></a>
Repeat the process on every social icon you want to open in a new tab.
Adding social media icons using ETmodules font
The ETmodules, which is a font family available in the Divi theme, includes the graphics of social icons and will come into play here. If you have not created a menu yet, create one by going to the WordPress Admin Panel, then navigate to Appearance → Menus, and then add the pages of your site.
A full list of icons available in ETmodules font can be found here.
To add a social media channel icon say for example Facebook, simply add a customizable link to the menu and then insert the code below into the Link Text field:
<span class=”divi-facebook”></span>
Add the target link of this icon in the URL field. So in our case, it is https://www.facebook.com/b3multimedia. The same process is applied to Twitter, Pinterest, YouTube, Google+, and all other social media networks.
Adding a bit of custom CSS code into your child theme’s style.css file or to the Divi Theme Options (Divi → Theme Options → General → Custom CSS) will make everything work. Here is the code using Facebook and Twitter as examples:
|
1 2 3 4 5 6 7 8 9 10 11 12 13 |
.divi-facebook:after { content: "\e094"; display: block; font-family: "ETmodules"; font-weight: normal; } .divi-twitter:after { content: "\e095"; display: block; font-family: "ETmodules"; font-weight: normal; } |
All social media icons have their own content code which you will need:
|
1 2 3 4 5 6 7 8 9 10 11 12 13 14 |
Facebook = content: "\e093"; Twitter = content: "\e094"; Instagram = content: "\e09a"; YouTube = content: "\e0a3"; Pinterest = content; "\e095"; Google Plus = content: "\e096"; LinkedIn = content: "\e09d"; Skype = content: "\e0a2"; Vimeo = content: "\e09c"; RSS = content: "\e09e"; Tumblr = content: "\e097"; Flickr = content: "\e0a6"; Dribbble = content: "\e09b"; Myspace = content: "\e0a1"; |
These two methods are some of the easiest ways to add social media icons to your Divi website. By providing your visitors with easy access to your social media channels, you will be able to build an engaging user experience with your business or brand. Let us know which method you chose and how well it worked for you by commenting below!
Maciej Ekstedt
Maciej is the founder and CEO of B3 Multimedia Solutions. He is a self-made web designer and marketing expert, and he loves his job so much that he barely leaves the office. He transforms creative ideas into effective strategies for his company and for his clients. Maciej is fascinated by the phenomenon of megalopolis. He notices patterns and details which make up the whole thing, and he uses these skills in his work.
Get Divi Icons PRO today!
We have a sweet deal for you! You can get the best icon plugin for Divi with a 10% discount! Use the coupon code DIVIICONS10 at checkout!


Excellent write up and thank you! And as a proud Divi Icons Pro user, even more thanks!
Thank you Logan 🙂 This makes my day! Really appreciate your kind words.
Great post. Thanks Maciej
Hi, it doesn’t say what the content code of the social networks is, why you need it and where you need it. I don’t understand what the content code is. You just place an icon and a link. What’s the code?
Hmmm… I don’t really understand what is not clear for you Maarten. Have you followed the tutorial carefully? It adds icons to the menu and all code you need to use is included in the article. You need to enqueue font awesome and then add proper class to the menu item. That’s it.
Hi
Thank you for the help. I used the second method. It worked well, but it made my menu height a lot higher…. How can i fix this ?
Here is the website : http://lakifff.e-magencia.com/ (still in process)
Thanks
How would you add the WhatsApp icon, please Maciej?
Hi Chris, WhatsUp icon is available in the FontAwesome library. If you add it to your Divi site, you can follow this tutorial and you should be able to add WhatsUp icon as well 🙂 You just need to use a proper code for the icon.
Interesting to learn how to put the social icons on Divi. Thank you!
Really useful tips. Thanks for sharing this tutorial. We recently launched similar website. You will check out WPorion.