Divi Plugin Highlight – Testimonial Slider
Using Testimonials on your website is one of the easiest and cheapest forms of marketing. Testimonials share the benefits of your products or services and they build a relationship of trust and credibility with your customers. Having testimonials on your website is one of the smartest and cheapest strategies you can use to build your business.
This is the reason that B3 Multimedia built the Divi Testimonial Slider. To help you incorporate and display those fabulous testimonials easily and effectively on your website.
The Divi Testimonial Slider plugin was released on 9 December 2016. B3 Multimedia took the Divi Builder Module and added a bundle of extra options, making it a fully customizable plugin. It incorporates 2 Divi Builder modules, the Testimonial Slider and the Grid/List view. There is also a slider widget which can be used in a sidebar or footer area.
Purchasing a plugin
Purchasing the product is quick and easy. The Testimonial Slider Plugin is available under two types of licenses. A Regular License for use on only one website and an Extended License for use on many websites.
Clicking on the purchase adds the Testimonial Slider to your basket. Then click on View basket to see the plugin item. Here you see a summary of the item, what it costs and if you have a coupon code you can input it into the coupon code area. To check out the item, click on Proceed to Checkout where you are presented with a screen for filling in billing information. Payment with Paypal is seamless and once the plugin is paid for, you are taken to the Order Received Page which lists the product purchased and your customer details.

After your purchase, an email is sent to you to change your password for your newly created account. Changing the password is also a simple process and once that is done, you can easily access your product via the Downloads button on the left-hand side of the page. Downloading is simply a matter of clicking on the Download Testimonial Slider text on the right-hand side under the Download heading. When purchasing the plugin, you are sent a series of 3 emails. One for your account with your password and a link to change it in your account settings. Another email thanking you for your order with your purchased item details as payment details. The third order provides a link to download the file (if you have not already downloaded it from the website) and it also provides the API license key.
Each customer has their own My Account area where you can see your orders, obtain your API Keys, download your purchased items, update your Account Details and request Support.

Installation
To install the plugin, you simply install it like a regular plugin. Select Add New plugin and then upload the zipped format of the plugin on to your website and make sure you activate the plugin so that you can start using it. When you activate the plugin you are shown a screen where you have to input your API Key and your email address. This information is provided in one of the 3 emails sent after purchase of the plugin or via the My Account area. Once these fields are completed, you need to save all the changes.
Now you will notice the following changes in your WordPress dashboard:
- There is a new Testimonials tab in the dashboard
- There are also new options in the Divi tab which allows you to make changes to the testimonial archive page slug
- There are 2 new modules in the Divi builder, namely the Testimonial Slider and the Testimonial Grid/List. These can be used on any page
- A new widget appears in the Appearance/Widget area.

Adding testimonials
Testimonials are straightforward to add. Simple select Testimonials tab located in your WordPress Dashboard and add your customer testimonials individually. This is where you input all your testimonials that feed into either your Slider or the Grid/List. The following fields can be populated to provide as much or as little information as you want. Customer’s Name,
Customer’s Image (upload or enter URL), Customer’s Company Name, Customer’s Website URL, Testimonial.
Testimonials can be assigned to specific categories so they are easy to sort and display on specific pages.

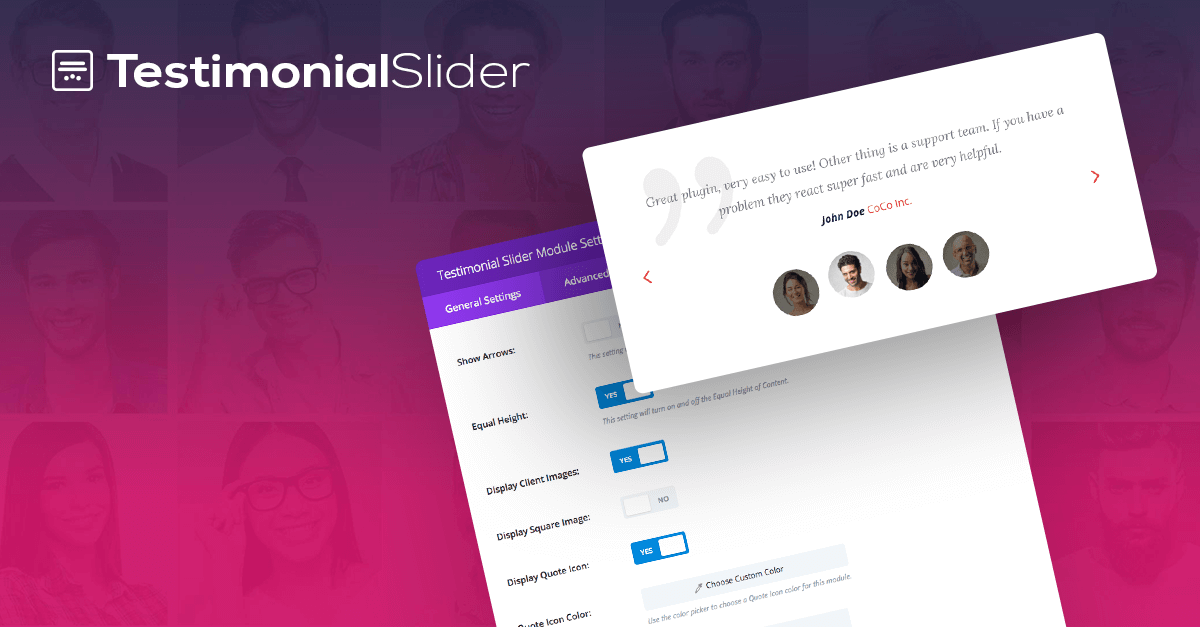
Using Testimonial Slider Module
To use the Testimonial Slider, go into the page you wish to edit and add a new section. Depending on the layout you want, you can select the row layout and then add the Testimonial Slider as a module from the Divi Modules.
The Divi Testimonial Slider has a wide range of options you can choose to set up your testimonials so that they appear in the design and format you choose. You are able to select how many testimonials are displayed, what categories you wish to display, in what order you would like the testimonials displayed, whether you want the client images displayed, if you want the content to be equal height, the size of the image you want displayed, whether to display a quote icon, and what colour to display the icon. There is also a Custom CSS tab that makes it even more customizable. Adding custom CSS to each element lets you achieve the exact look you want.

Using Testimonials Grid/List
To use the Testimonial Grid/List module, when you select Insert Module you will notice the new modules that you can add to your page. Select the Testimonial Grid/List and when the module opens your first choice is to choose between the List format or the Grid format.
Choosing the List format allows your testimonials to be listed one under each other on your page. Options are provided for customization such as a count of Testimonial Per Page, an Equal Height Box setting, Display Quote Icon setting, Display Image setting, Display Category On Filter and Display Pagination. There is also the Advanced Tab for further custom CSS customisation.
The Grid option has the same customisation options but provides a view of the testimonials side by side down the page.

Using Widget
Testimonials can also be displayed in widgets. In the Widgets area there is now an added widget called B3multimedia: Testimonial Slider. This widget can be added to the Sidebar or to any of the Footer areas. There is a choice of 2 styles or a custom style. Here you can also select the Testimonial Category, the Number of Testimonials to display, the speed of the testimonial transitions, whether to Display autoPlay, and an autoHeight setting. Further customisation options include customizing the colours in the Heading, Heading background Colour, Text Colour, Client Name Text Colour and Pagination (dots) Active/Navigation (arrows) Hover Colour. The plugin allows for detailed customisation so that it is easy to obtain the correct look and feel for your testimonials on your website.

This plugin makes handling testimonials on your website a cinch! It provides great value and its ease of use and customisation options make it a must have for every Divi website.

Vera Evans
ET Digital Designs
Use coupon code SLIDER15 at checkout!


0 Comments