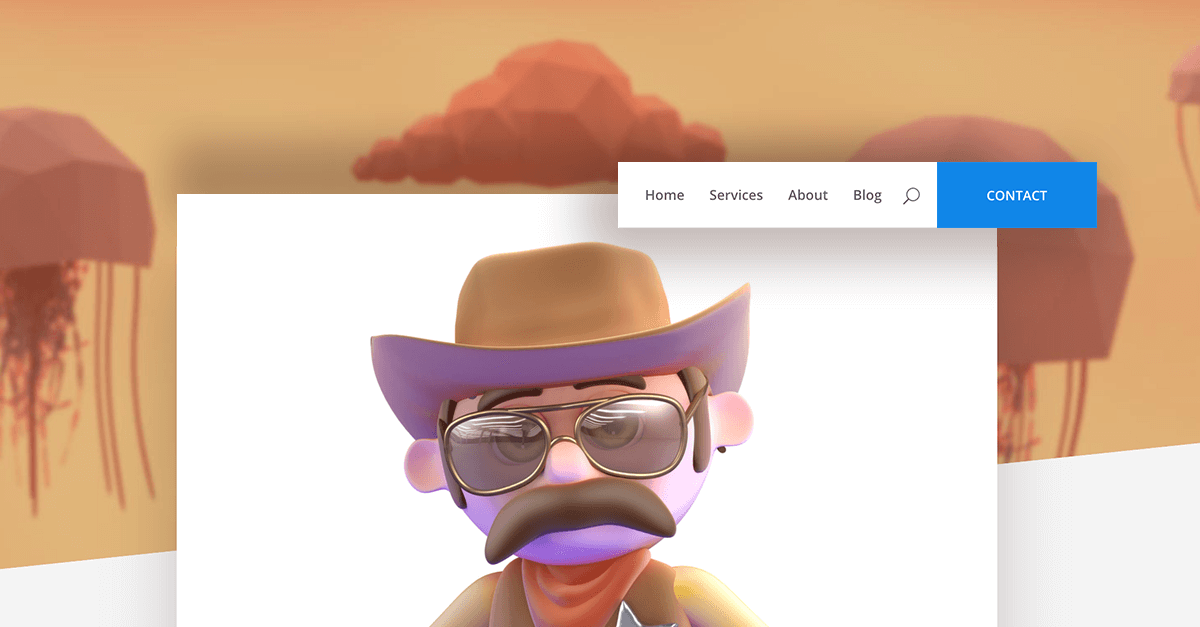
How to Add an Animated Google Style Button to Main Menu Navigation in Divi

- You will need Divi Theme by Elegant Themes installed.
- All operations are made on Divi Child Theme files. If you did not create child theme yet then it is a good moment to create one and start building website of your dream. More informations about creating child theme can be found here:
How to Create a WordPress Child Theme for Divi
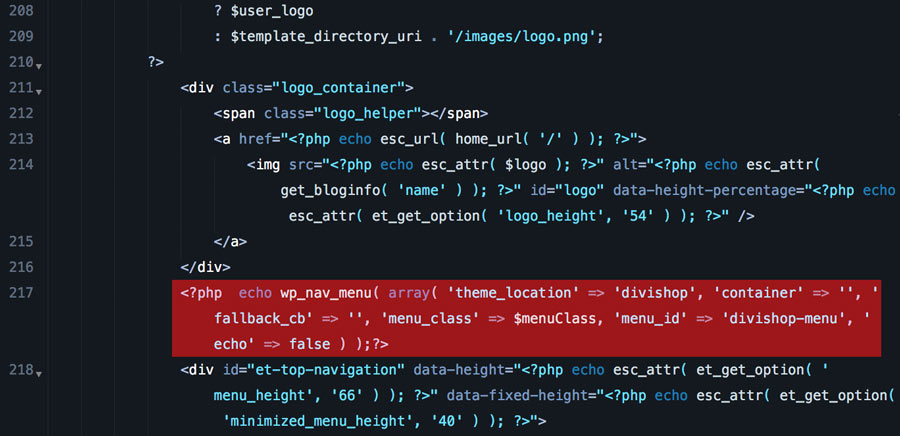
Add code to header.php
1. Open header.php file located in your child theme folder.
* If you do not have header.php file in your child theme folder, then copy it from parent Divi theme and paste to your child theme folder.
2. Add the following code below logo_container div:
|
1 |
<?php echo wp_nav_menu( array( 'theme_location' => 'divishop', 'container' => '', 'fallback_cb' => '', 'menu_class' => $menuClass, 'menu_id' => 'divishop-menu', 'echo' => false ) );?> |
Add custom js
Create js folder in your child theme root directory and create divicustom.js file inside it. Add below code and save:
|
1 2 3 4 5 6 7 8 9 10 11 12 13 14 |
$divishop = jQuery('#divishop-menu'); if ( $divishop.length ) { jQuery(window).scroll(function() { var scroll = jQuery(window).scrollTop(), objectPosition = $divishop.offset().top; var divishopwidth = jQuery('#divishop-menu').width(); if (scroll > 400) { jQuery('body').addClass("et_divishop_cta"); } else { jQuery('body').removeClass("et_divishop_cta"); } }); } |
Edit functions.php file
In this step we need to enqueue js file that we created in the previous step and register function. Open functions.php and add the following code:
|
1 2 3 4 5 6 7 8 9 10 11 12 13 |
add_action( 'wp_enqueue_scripts', 'my_enqueue_assets' ); function my_enqueue_assets() { wp_enqueue_script('divicustom', get_stylesheet_directory_uri() . '/js/divicustom.js', array(), '', true); } add_action( 'after_setup_theme', 'b3_shop_register_menu' ); function b3_shop_register_menu() { register_nav_menu( 'divishop', __( 'Shop Menu') ); } |
Add CSS styles
Add below code to style.css located in you child theme folder:
|
1 2 3 4 5 6 7 8 9 10 11 12 13 14 15 16 17 18 19 20 21 22 |
/*Menu Slide in effect*/ @media only screen and (min-width: 981px) { .shop-show-hide-desktopmobile {display:none !important;} ul#top-menu li.menu-item:nth-last-child(2) {padding-right:0px !important;} ul#divishop-menu {background: #fff;float: right;font-size: 15px;list-style: none;margin-right: -200px;margin-left: 20px !important;right: 0;z-index: 99;} ul#divishop-menu li {background: #fff;float: left;display: inline-block;font-size: 14px;text-transform:uppercase;} ul#divishop-menu a {color: #666666;display: block;line-height: 16px;padding: 24px 18px;text-decoration: none;font-size: 13px;font-weight: 600;} .et_divishop_cta .shop-float-in {overflow: hidden;transition: all 2.9s ease-out 0s !important;} .shop-float-in {transition: all 2.9s ease-out 0s !important;} ul#divishop-menu .shop-float-in a:hover {text-decoration: none;} ul#divishop-menu li.shop-cta{background: #1e88e5; position: relative;} ul#divishop-menu li.shop-cta:hover{background: #0055a5;} ul#divishop-menu li.shop-cta a{color: #FFFFFF;padding:25px 50px;} .et_divishop_cta #access-menu{margin-right: 25px;transition: all .6s ease-out 0s !important;} .et_divishop_cta ul#divishop-menu {margin: 0 -30px 0 0;} #main-header .et_menu_container,#divishop-menu,#access-menu,#et-top-navigation,.et_fixed_nav #et-top-navigation{ transition: all .4s ease-out 0s !important;} } @media only screen and (max-width: 980px) { ul#divishop-menu {display:none;} } |
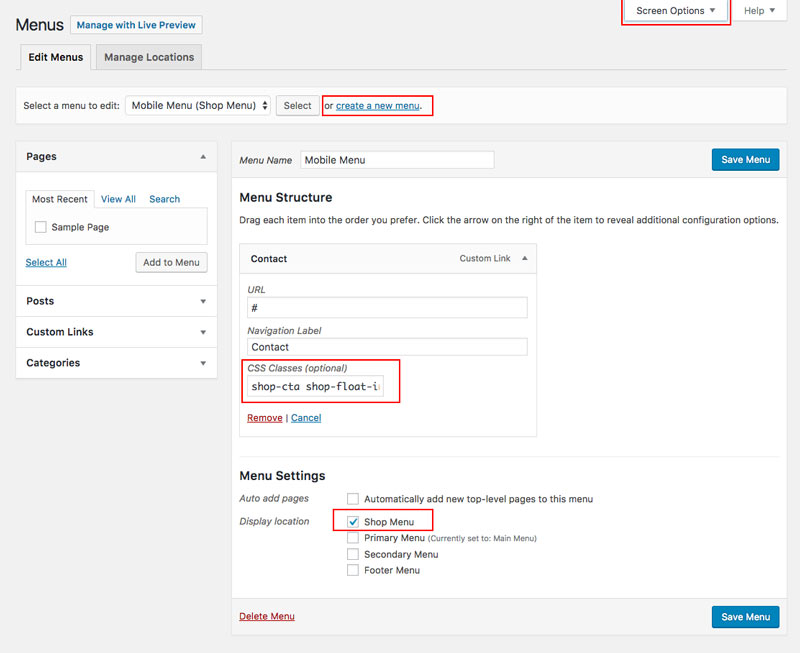
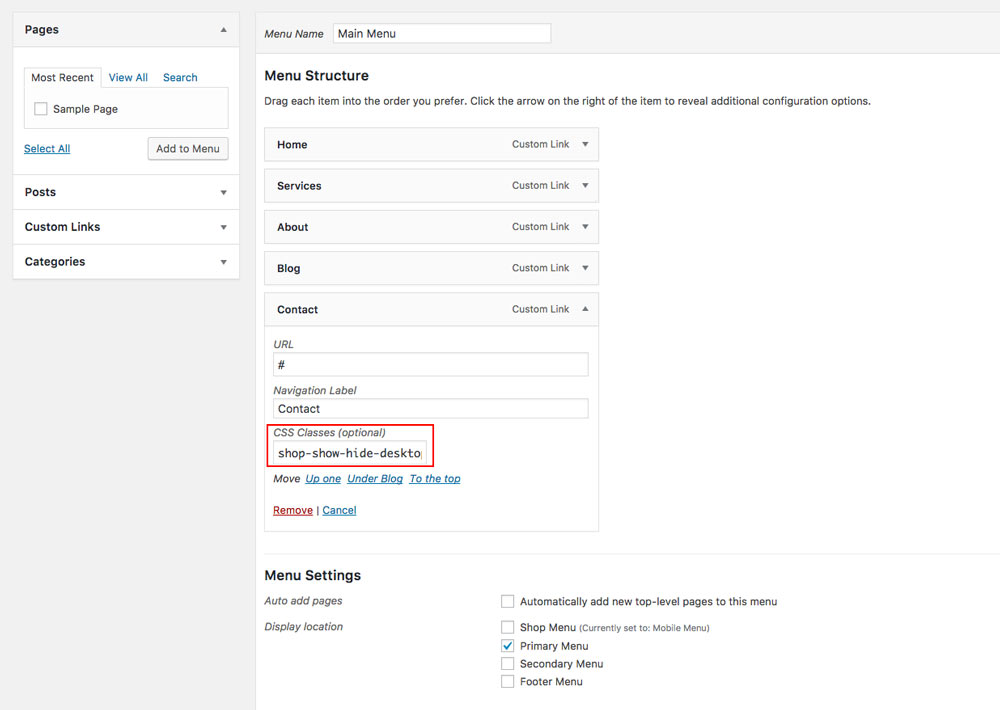
Create New Menu
1. Go to Appearance/Menus and create new menu.
2. Add menu item you would like to have animated.
3. Add class shop-cta shop-float-in and select Shop Menu below, Save.
* If you do not see CSS Class field then it means it is not enabled. To fix it click on Screen Options located in top right corner and select CSS Classes
Edit Primary Menu
1. Go to Appearance/Menus and select Primary Menu
2. Add class shop-show-hide-desktopmobile to the item you want to have animated
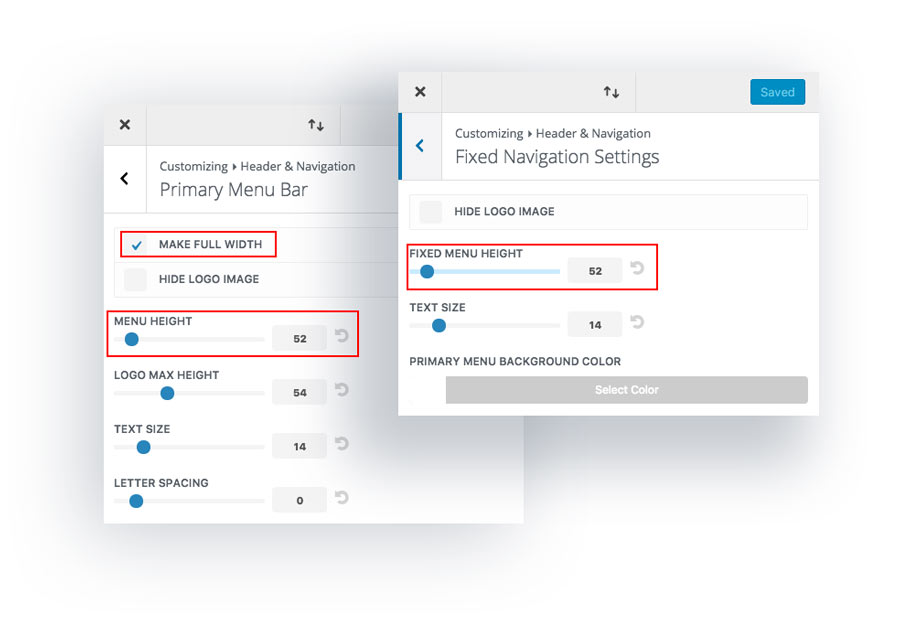
Edit Customizer Settings
Primary Menu Bar:
1. Got to Divi/Theme Customizer
2. Select Header & Navigation/Primary Menu Bar
3. Select Make Full Width option and set Menu Height to 52
Fixed Navigation Settings:
1. Select Header & Navigation/Fixed Navigation Settings
2. Set Fixed Menu Height to 52
Maciej Ekstedt
Maciej is the founder and CEO of B3 Multimedia Solutions. He is a self-made web designer and marketing expert, and he loves his job so much that he barely leaves the office. He transforms creative ideas into effective strategies for his company and for his clients. Maciej is fascinated by the phenomenon of megalopolis. He notices patterns and details which make up the whole thing, and he uses these skills in his work.
Create amazing websites in minutes.
Polygon is a multipurpose Premium Divi Child Theme perfect for creatives & professional agencies.


Cool little snippet. I’m looking forward to trying it out.
Cool, but instruction #2 is jargon to those who don’t understand code like I do 🙁
Hi Mary. Sorry to hear that. It’s true, editing functions.php file requires some coding knowledge. Please open chat window on our site and we will see how can we help you make it working.
Had to go through dozens of websites for reaching this post again. Last time it was when you shared about this on the fb divi group 🙂
Want to try this on a new site and see how it goes…
Another great tutorial and code freebie. Thank you for the clean and comprehensive work!
Another awesome tutorial. I may use it on my next creation as a replacement of the bottom contact sticky button.
Thanks a lot for your share, keep up the great work;)
Awesomeness!!! Can we utilize this button for anything else or does it have to be Shop only. Also the fixed 52px menu height, it that required to be that number? Can it be changed?
Hi Matt. You can use whatever link you want. Also height can be changed 🙂
Hey !
Great Tutorial.
But, it doesn’t work with Divi 3.0.84 update.
I guess, it could be because of ” changes made in class/id name “.
If you can update and mention at the start itself, that this snippet support DIVI 3.0.XX version would be great help.
Thanks
Anyways
Hi Anurag, thanks for the comment. We have checked and this tutorial works fine with the latest WP and Divi 3.0.86. You must be missing something.. Please follow all steps carefully and let me know how it goes.
Hey Maciej
Its working !
Must be my mistake..
Thanks a lot !
Hi! I love this tutorial! I discovered now that I got an error/warning in my child theme because of the header.php.
Notice: Undefined variable: menuClass in /home/public/sites/www.aardingcarlifts.nl/wp-content/themes/AardingCarLifts/header.php on line 220
Any idea what it could be?
Hi Christian. Do you use our tutorial on your website and is this something that is causing this issue? I visited your site and cannot see animated button and also no error in the console.
The website is aardingcarlifts.nl, which is a website of a client.
The only thing I can see “Failed to load resource: the server responded with a status of 400 ()” and it seems to be referring to google fonts – https://imgur.com/a/8uah3
You may experiencing caching issue. Make sure you clear all caches and see if error you mentioned still persists. BTW. Nice website. This button looks awesome there!
I do not understand anything about Child Theme and honestly I have no idea of the importance of having one. The question is. Can I do this tutorial on a site without Child Theme?
Hello Carlos,
It is strongly recommended to use child theme for any tweaks, otherwise you will lose all your custom code after WordPress is updated. You can find more information about creating child themes here:
Ultimate Guide to Creating a Divi Child Theme